Zhagana

停更了近 3 年,终于又有空写个小文章,关于 Playwright,一个 Microsoft 开源的跨浏览器自动化工具,类似 Puppeteer 的 Chromium + Firefox + WebKit 版。

Step by step guide to use Playwright.

Project Setup

Create a as simple as we can project manually:

1
2
3
mkdir zhagana
cd zhagana
npm init

Install Playwright and TypeScript via npm, which may take some minutes to download browser binaries:

1
2
npm i playwright
npm i -D typescript

TypeScript Configuration

Playwright for JavaScript and TypeScript is generally available. But we still need some configuration for TypeScript. Create a tsconfig.json file with the following content:

1
2
3
4
5
6
7
8
{
"compilerOptions": {
"target": "es5",
"module": "commonjs",
"outDir": "build",
"sourceMap": true
}
}

VS Code Launcher and Debuger

Click the RUN button on the left menu then create a launch.json. Select Node.js from the drop down if you have other debugger extensions.

vscode-debuger

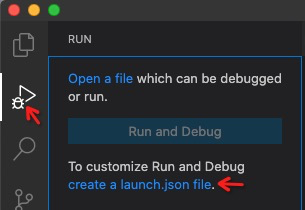
Make sure you have "preLaunchTask": "tsc: build - tsconfig.json" and "outFiles": ["${workspaceFolder}/build/**/*.js"] in launch.json.

1
2
3
4
5
6
7
8
9
10
11
12
13
14
15
16
{
"version": "0.2.0",
"configurations": [
{
"type": "node",
"request": "launch",
"name": "Launch Program",
"skipFiles": [
"<node_internals>/**"
],
"program": "${workspaceFolder}/index.ts",
"preLaunchTask": "tsc: build - tsconfig.json",
"outFiles": ["${workspaceFolder}/build/**/*.js"]
}
]
}

Coding

Screenshot

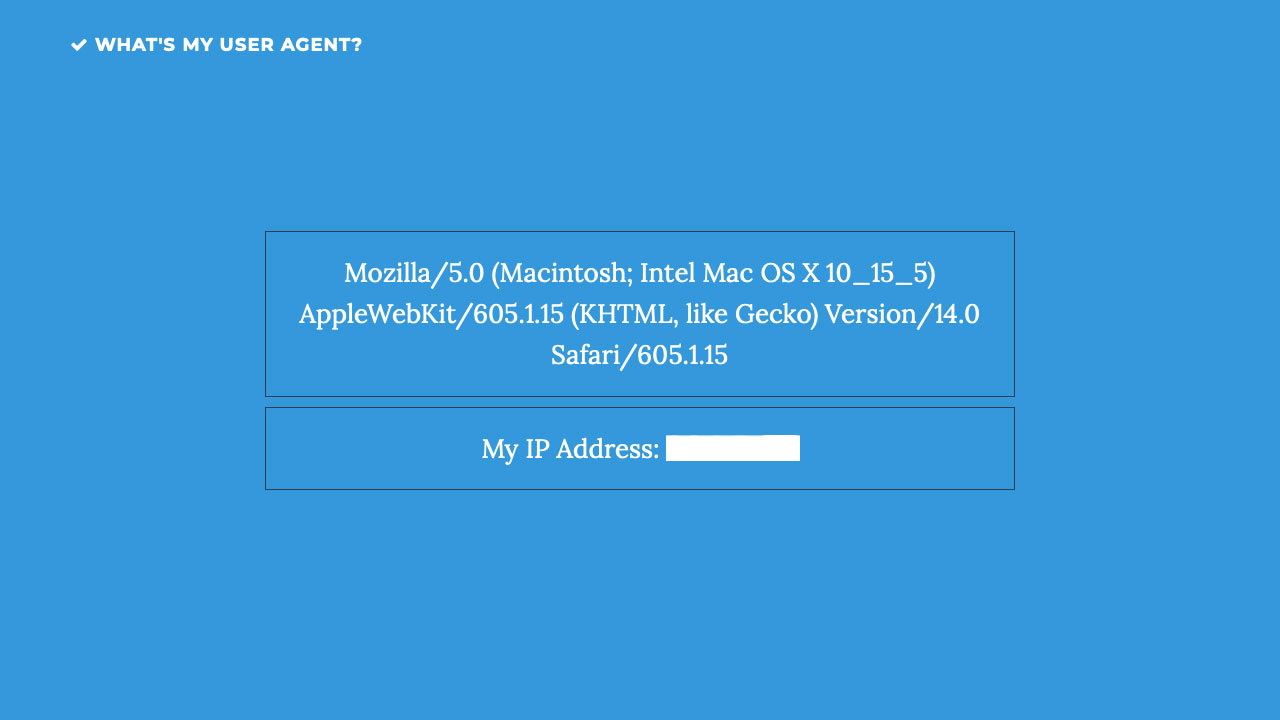
We will start by taking a screenshot of the page. This is code from their documentation, but transfer into TypeScript

1
2
3
4
5
6
7
8
9
import { webkit } from 'playwright'

(async () => {
const browser = await webkit.launch();
const page = await browser.newPage();
await page.goto('http://whatsmyuseragent.org/');
await page.screenshot({ path: `out/whatsmyuseragent.png` });
await browser.close();
})();

Press F5 to run our project, and we will get the out/whatsmyuseragent.png file like this

whatsmyuseragent

Now, let’s make it happen in 3 browsers:

1
2
3
4
5
6
7
8
9
10
11
12
13
14
15
16
17
18
19
20
21
22
23
import { Browser, BrowserType, chromium, firefox, webkit } from 'playwright'

async function screenshot(browserType: BrowserType<Browser>) {
// use `browserType` from arguments instead of hardcode
const browser = await browserType.launch();
const page = await browser.newPage();
await page.goto('http://whatsmyuseragent.org/');
await page.screenshot({ path: `out/ua-${browserType.name()}.png` });
await browser.close();
}

(async () => {
// 3 different kind of browsers
const BROWSER_TYPES = [
chromium,
firefox,
webkit
]
// make screenshot all together
await Promise.all(BROWSER_TYPES.map((browserType) => {
return screenshot(browserType);
}));
})();

Here we use the screenshot function to take the place of main function and use Promise.all to handle 3 browsers in parallel. After a few seconds, we will get 3 screenshots:

  • out/ua-chromium.png with HeadlessChrome
  • out/ua-firefox.png with Firefox
  • out/ua-webkit.png with AppleWebKit ... Safari

Emulation - Mobile Device

Next step, we will simulate browser behavior on a mobile device and navigate to Google Maps.

1
2
3
4
5
6
7
8
9
10
11
12
13
14
15
import { Browser, BrowserType, devices, chromium, firefox, webkit } from 'playwright'

async function screenshot(browserType: BrowserType<Browser>) {
// use `browserType` from arguments instead of hardcode
const browser = await browserType.launch();
// simulate browser behavior on a mobile device
const iphone = devices['iPhone X'];
const context = await browser.newContext({ ...iphone });
// open web page
const page = await context.newPage();
await page.goto('https://www.google.com/maps');
// take screenshot
await page.screenshot({ path: `out/map-${browserType.name()}.png` });
await browser.close();
}

Since firefox does not support mobile, we reduce our browsers to chromium and webkit only:

1
2
3
4
5
6
7
8
9
(async () => {
// firefox does not support mobile
const BROWSER_TYPES = [ chromium, webkit ]
// make screenshot all together
await Promise.all(BROWSER_TYPES.map((browserType) => {

return screenshot(browserType);
}));
})();

F5 again we will get 2 png file in out directory:

chromium webkit
chromium webkit

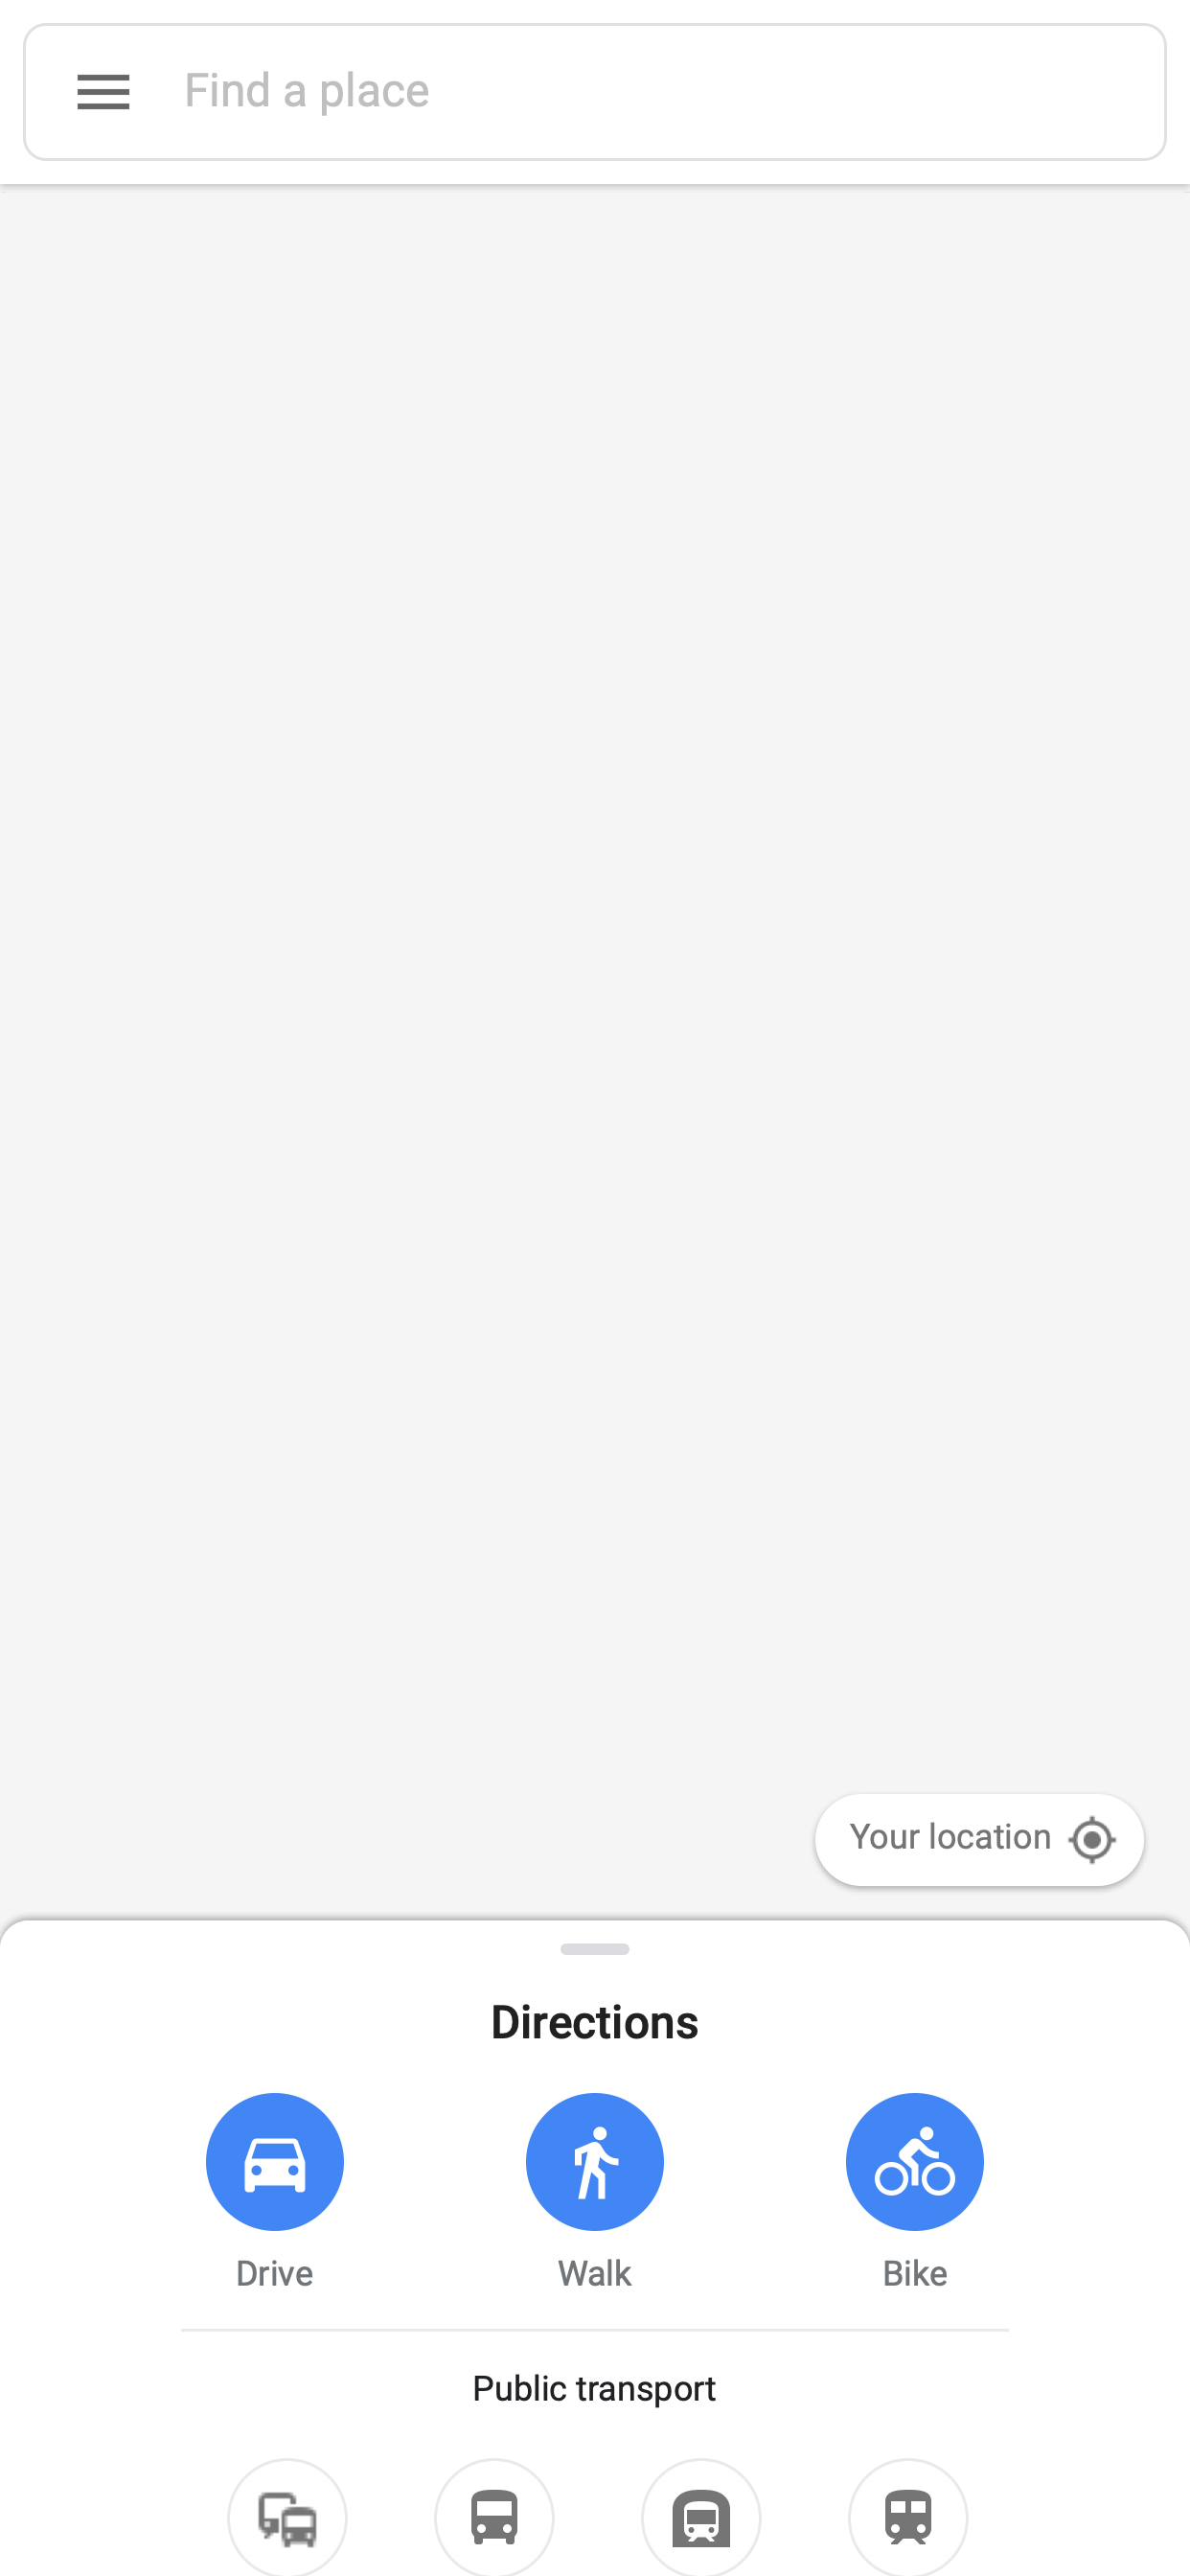
Maps came out, but seems not complete loaded. So we need .waitForNavigation() after page.goto():

1
2
3
await page.goto('https://www.google.com/maps');
await page.waitForNavigation();
await page.screenshot({ path: `out/map-${browserType.name()}.png` });

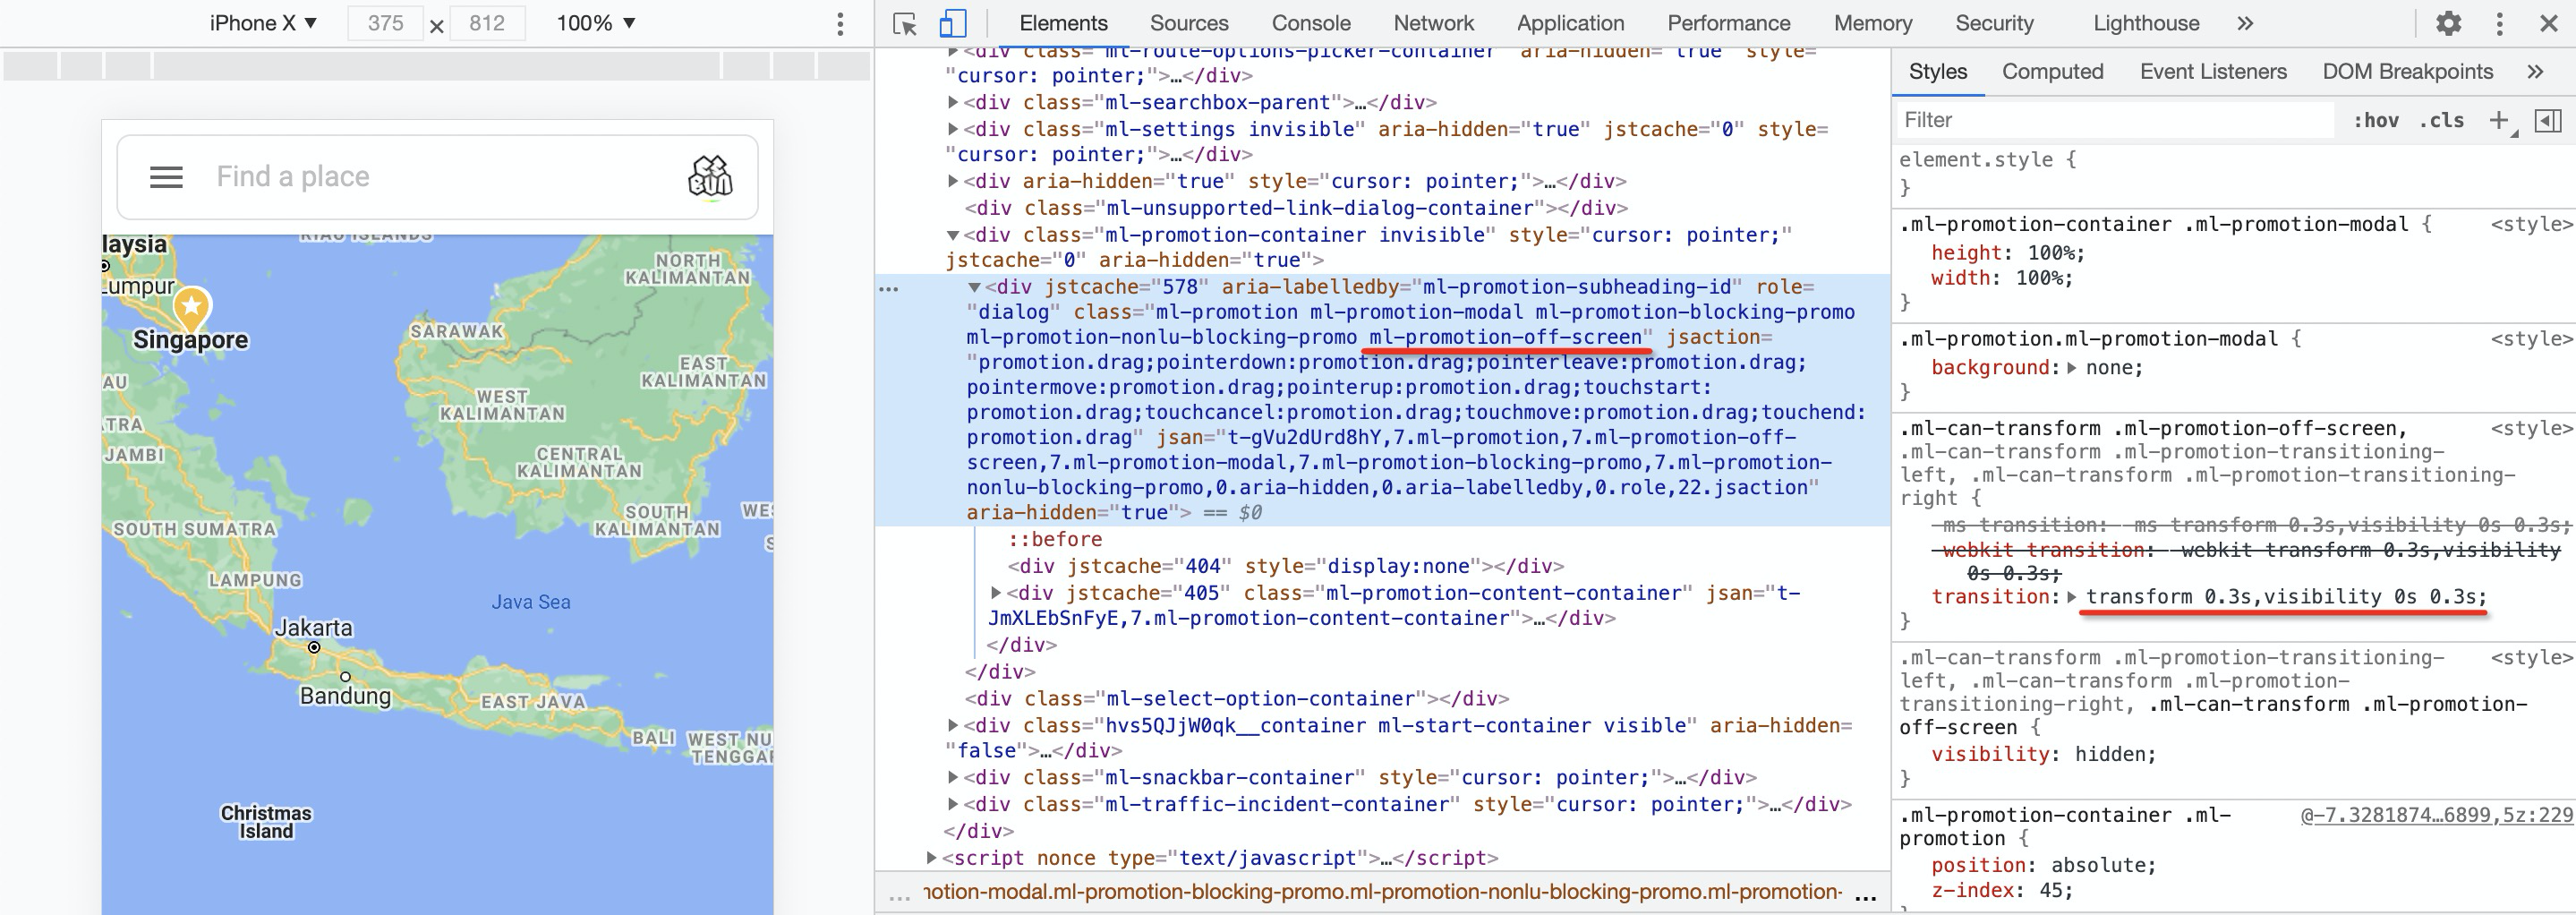
But, wait… there is a blocker comes up: Google Maps want us to download App but we just want to STAY ON WEB.
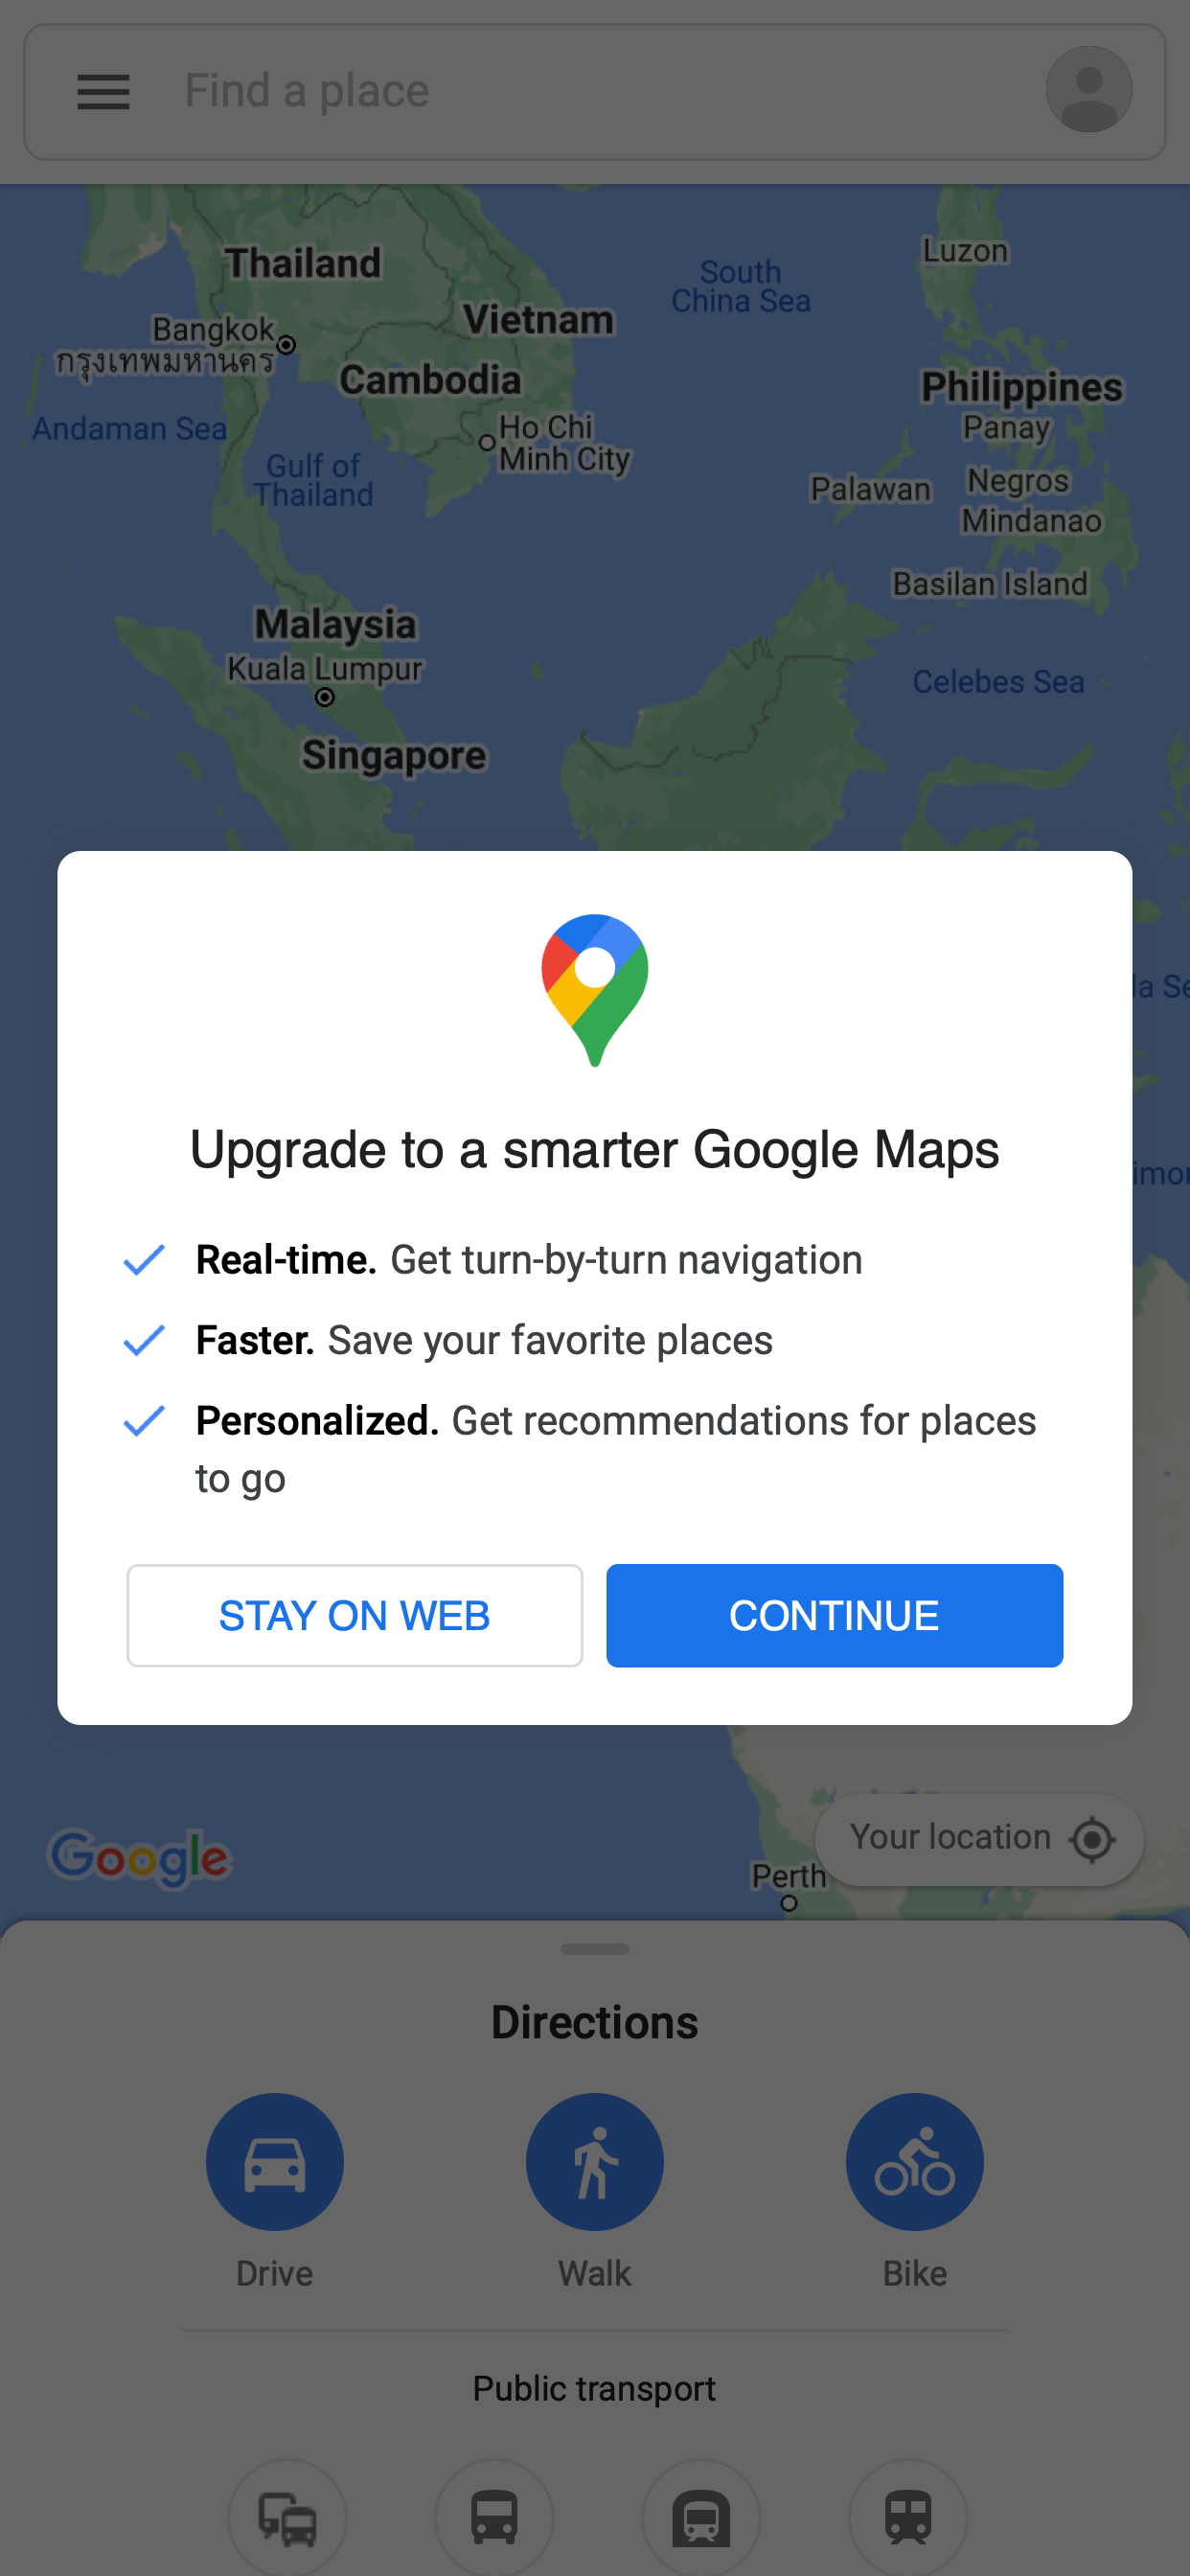
webkit

Input - Mouse Click

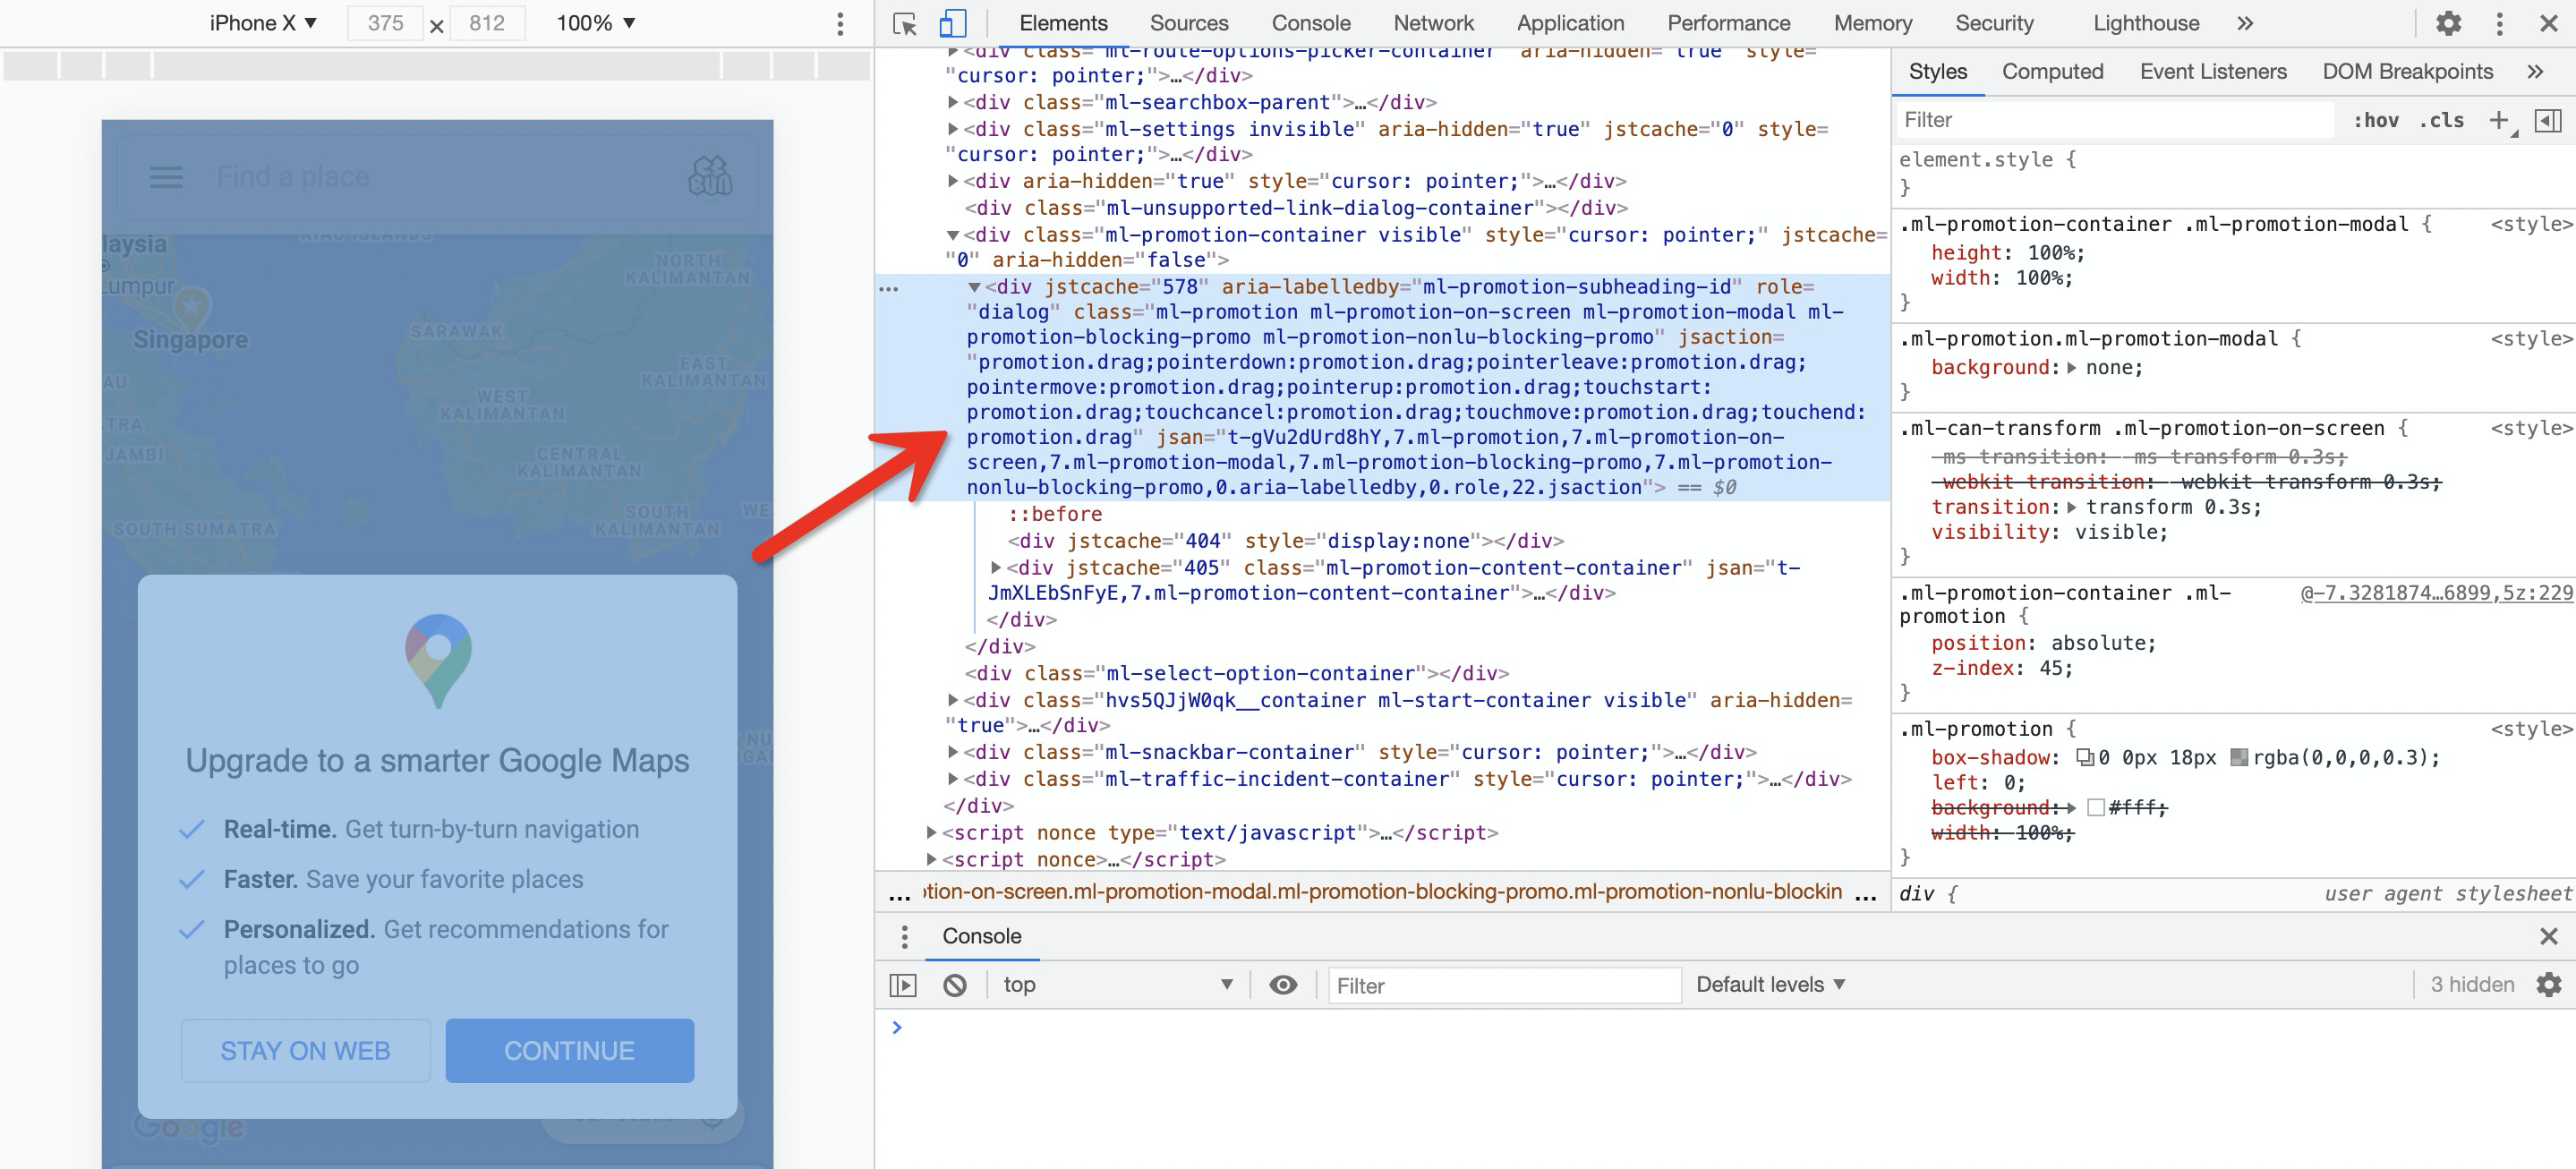
From devtools we can get the selector of this promo: .ml-promotion-nonlu-blocking-promo, use page.waitForSelector() instead of page.waitForNavigation() to catch the promotion:

Devtools - Pop

1
2
await page.goto('https://www.google.com/maps');
await page.waitForSelector('.ml-promotion-nonlu-blocking-promo');

So let’s click the STAY ON WEB button on the page! From devtools we can also get the selector of this button: button.ml-promotion-action-button.ml-promotion-no-button, use page.click() to trigger the click event:
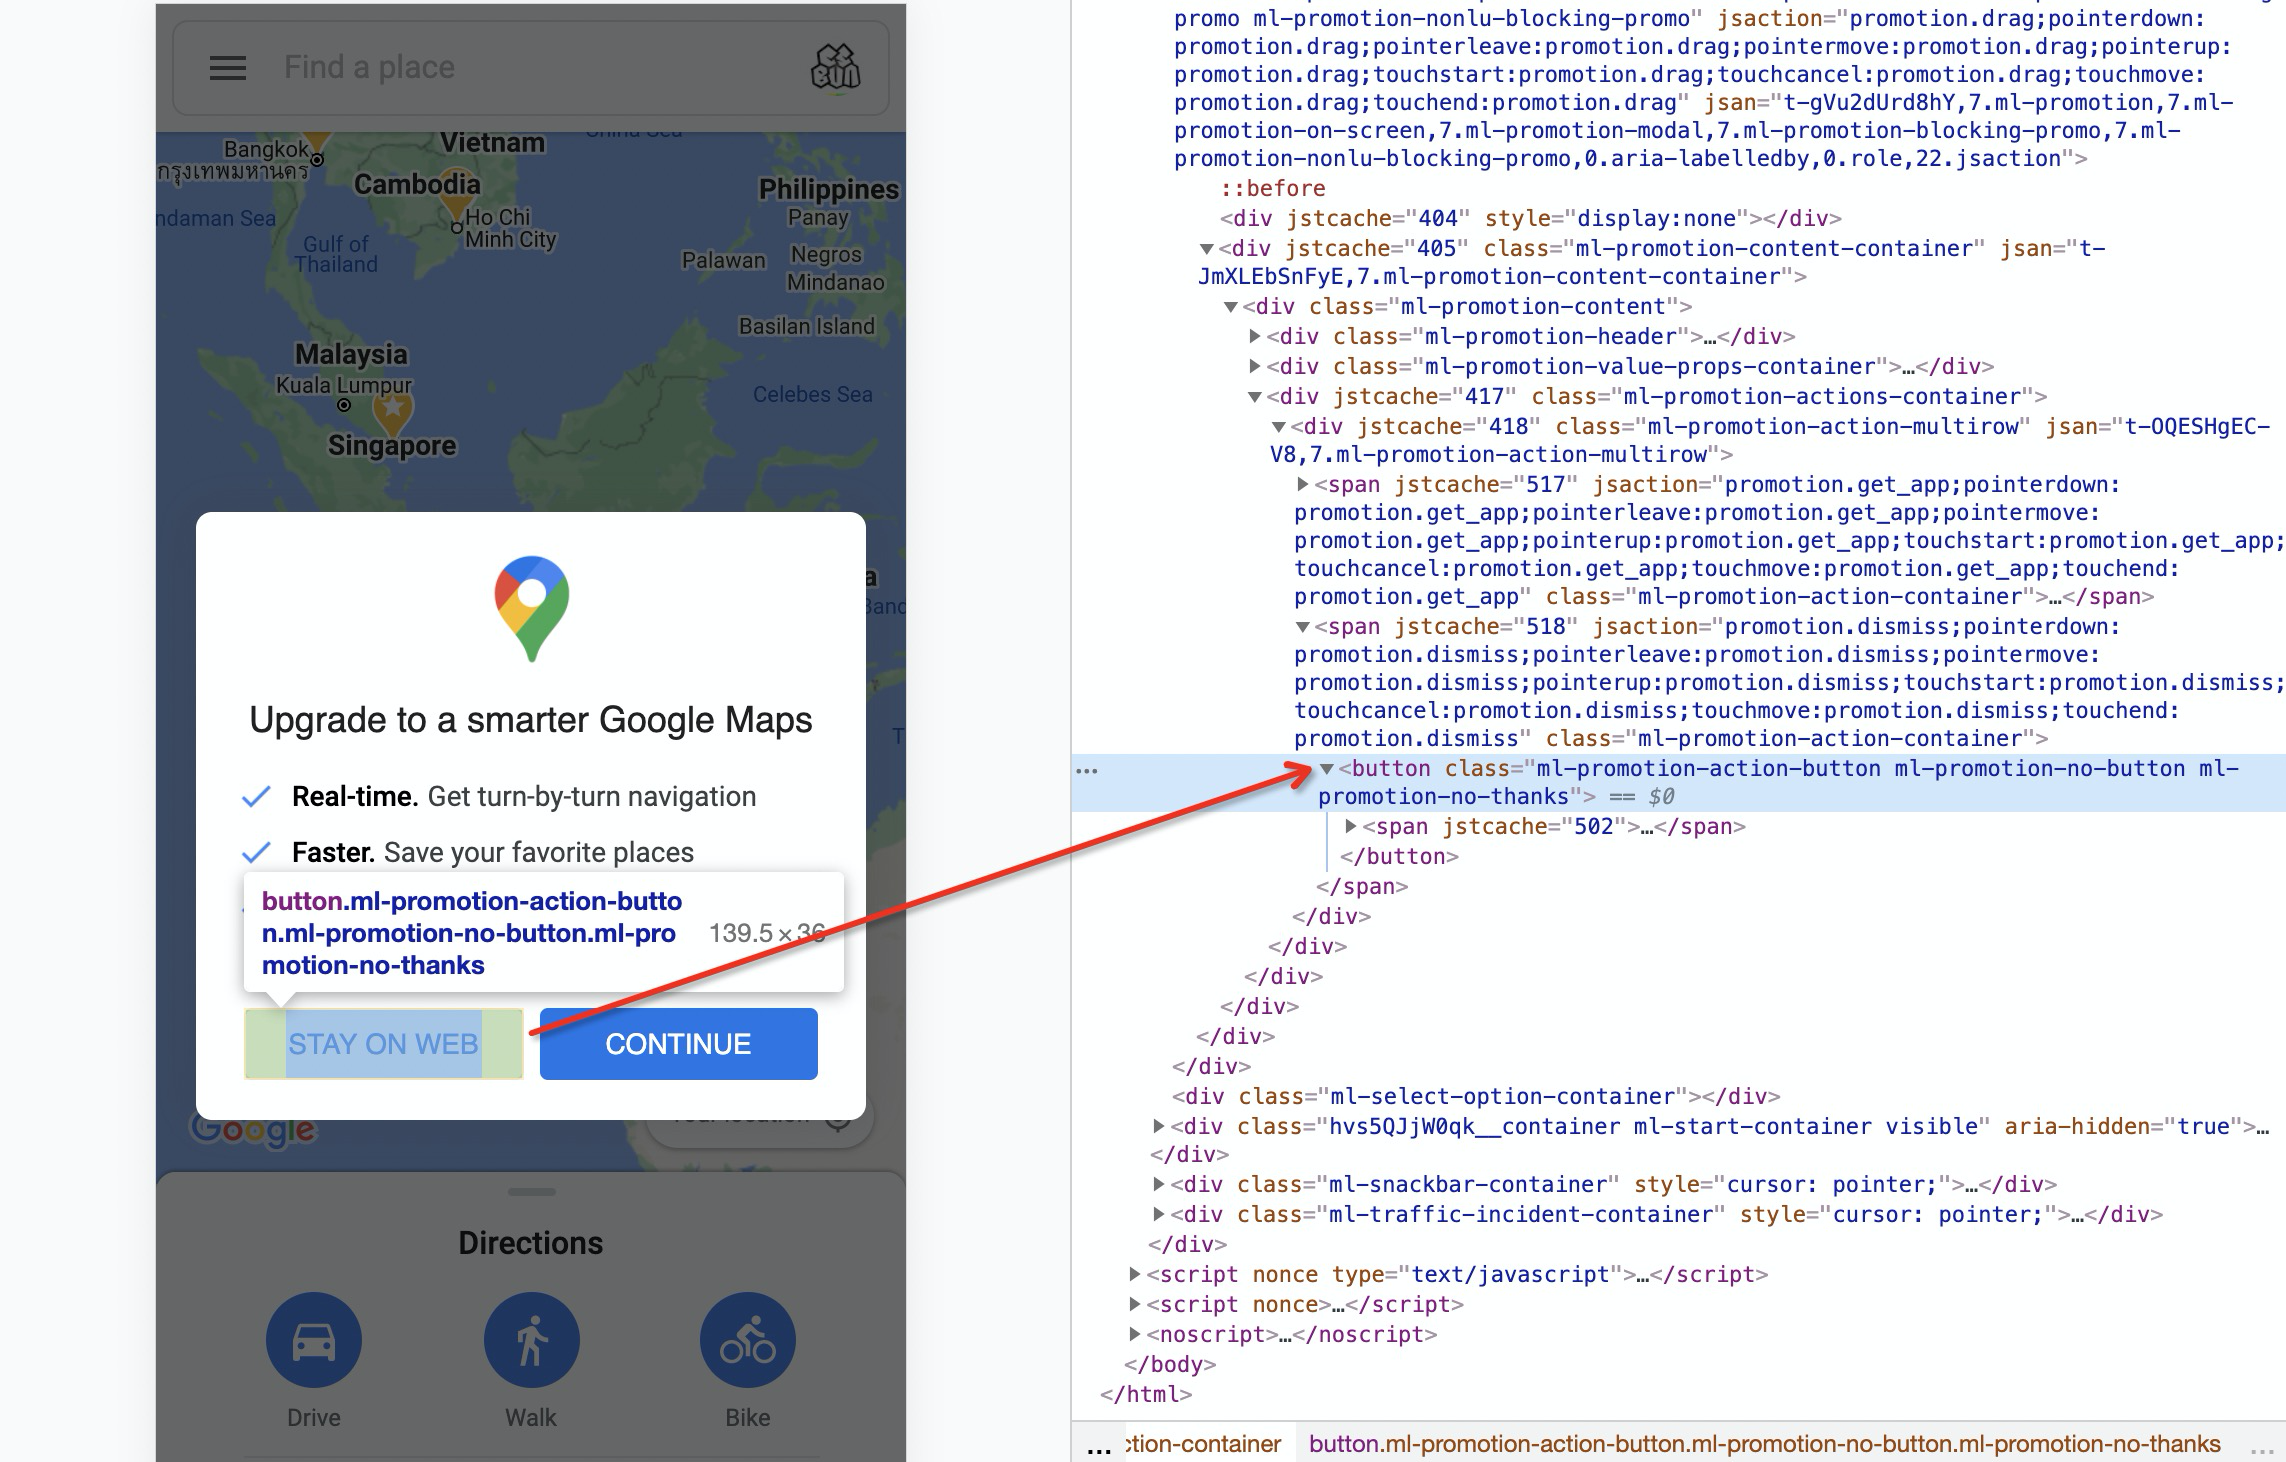
Devtools - Button

1
2
// click STAY ON WEB
await page.click('button.ml-promotion-action-button.ml-promotion-no-button');

As the invisible animation last for 0.3s, we need to wait for more than 300ms after button clicked, before we capture the screenshot.

Devtools - Pop off

1
2
3
// wait for more than 300 millisecond for browser to response with the events
await page.waitForTimeout(400);
await page.screenshot({ path: `out/map-${browserType.name

Emulation - Geolocation

Now we have the map in our current location (may be base on IP address) but we also have the ability to simulate to a different place. We can “fly” to town Tewo by
reating a context with “geolocation” permissions granted:

1
2
3
4
5
6
7
8
const context = await browser.newContext({
...iphone,
geolocation: {
longitude: 103.2199128,
latitude: 34.0556586,
},
permissions: ['geolocation'],
});

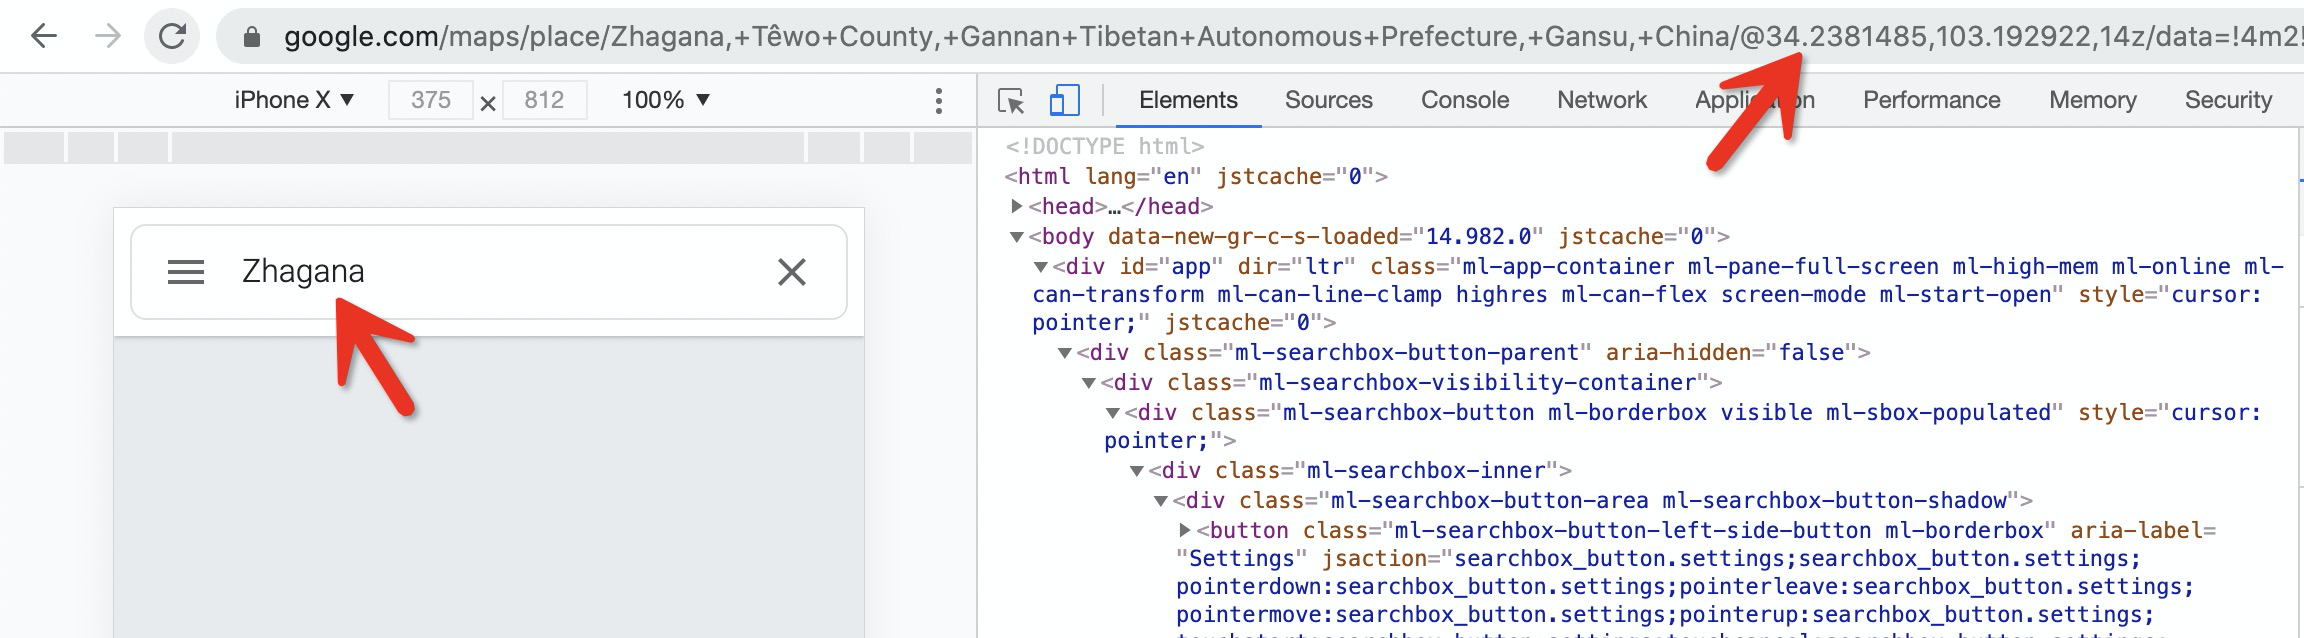
If you don’t konw the longitude and latitude of your “perfect place”, just search it in Google Maps then you can get it from the browser URL.

search-location

Click the Your Location button to navigate to our emulated geolocation.
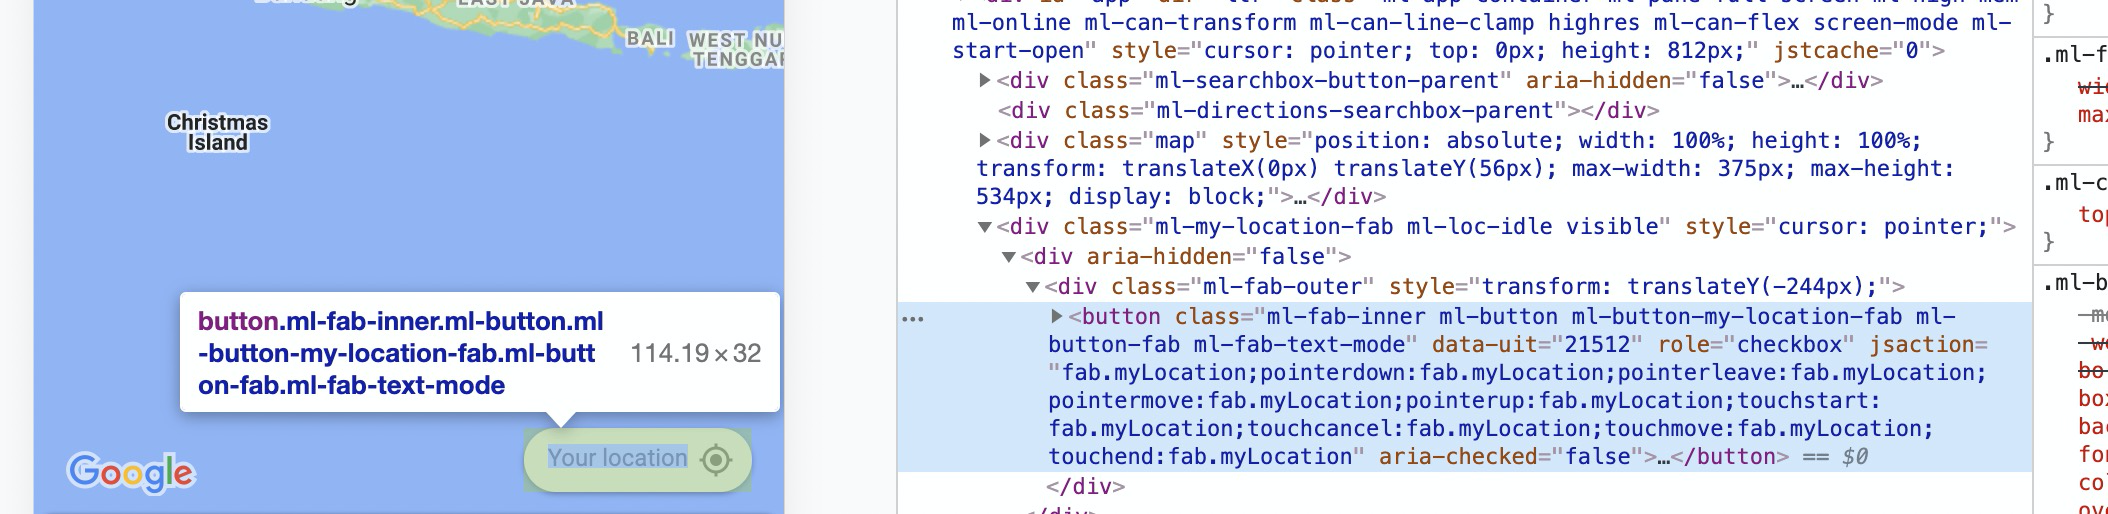
Your Location

1
2
3
4
5
// click `your location` to navi to current location
await page.click('button.ml-button-my-location-fab');
// As I can not find any event which means relocat finished,
// so we need to wait for some seconds for Google Maps to load resources
await page.waitForTimeout(500);

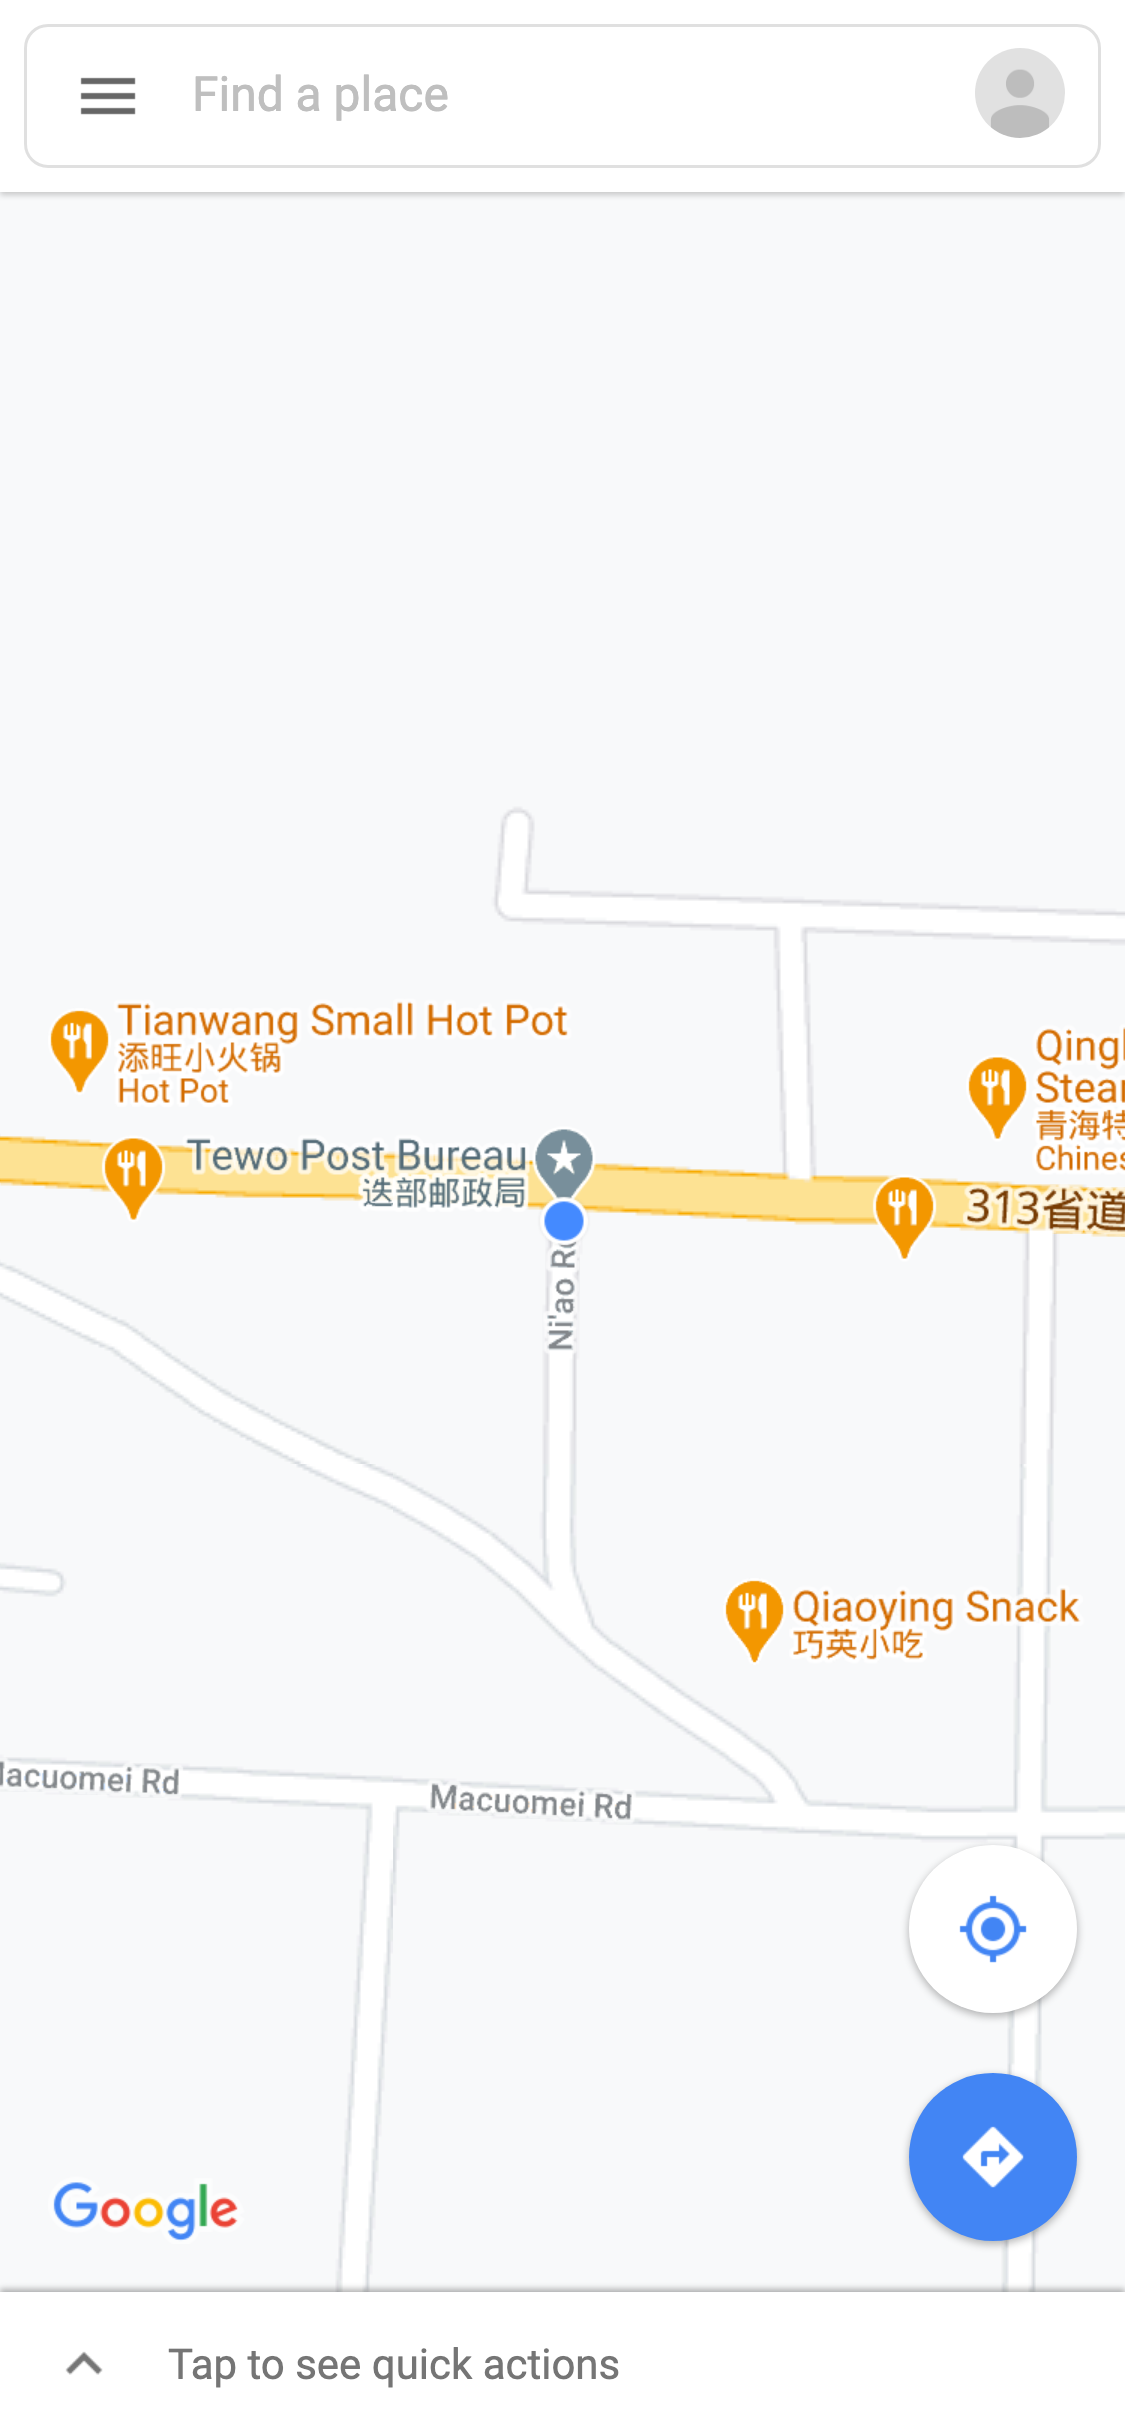
Re-run our project we will find us located in Tewo Post Bureau.

Tewo

Input - Text Input

After these simulations, we can start to control the page with more playwright APIs, just like what we click the page just now.

First, fill in the search bar with our target place, like Zhagana.
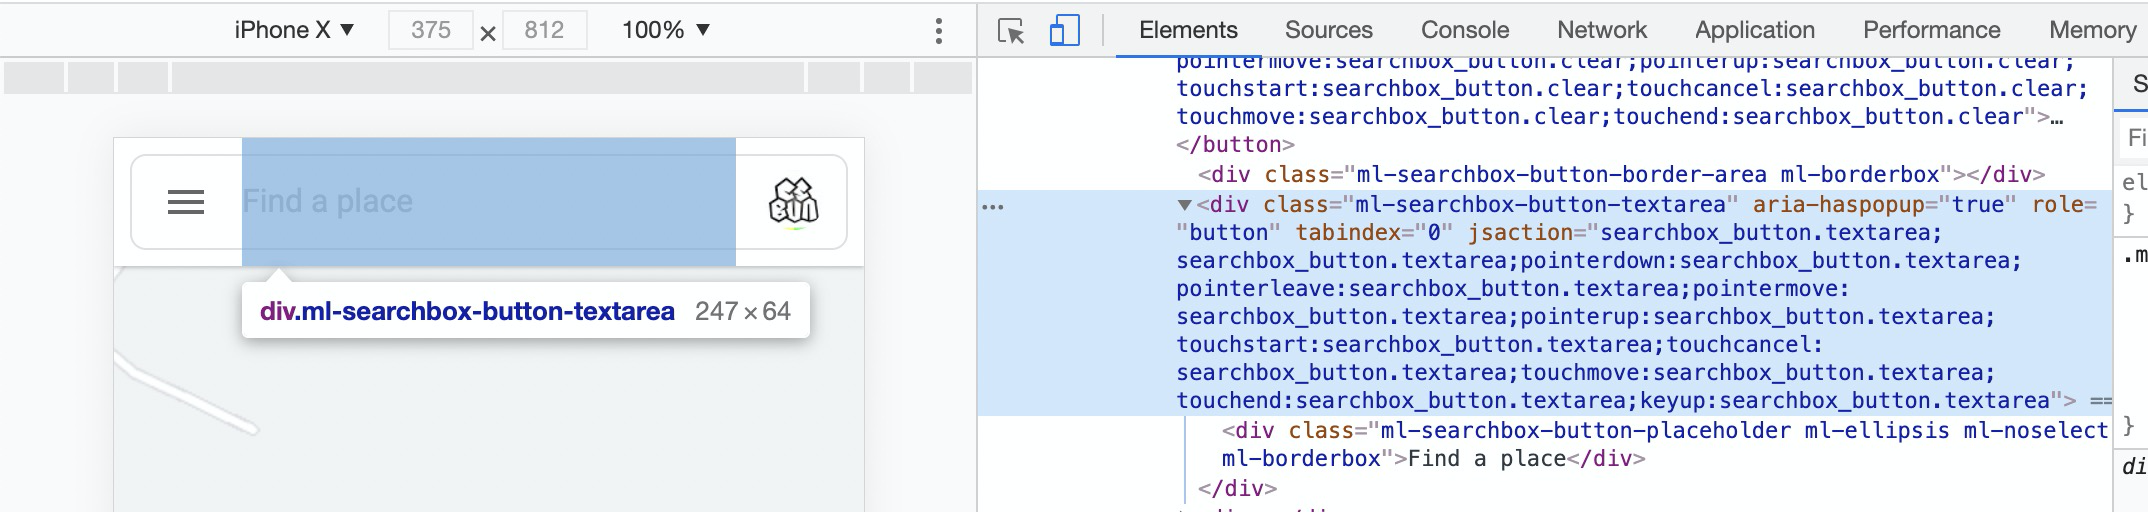
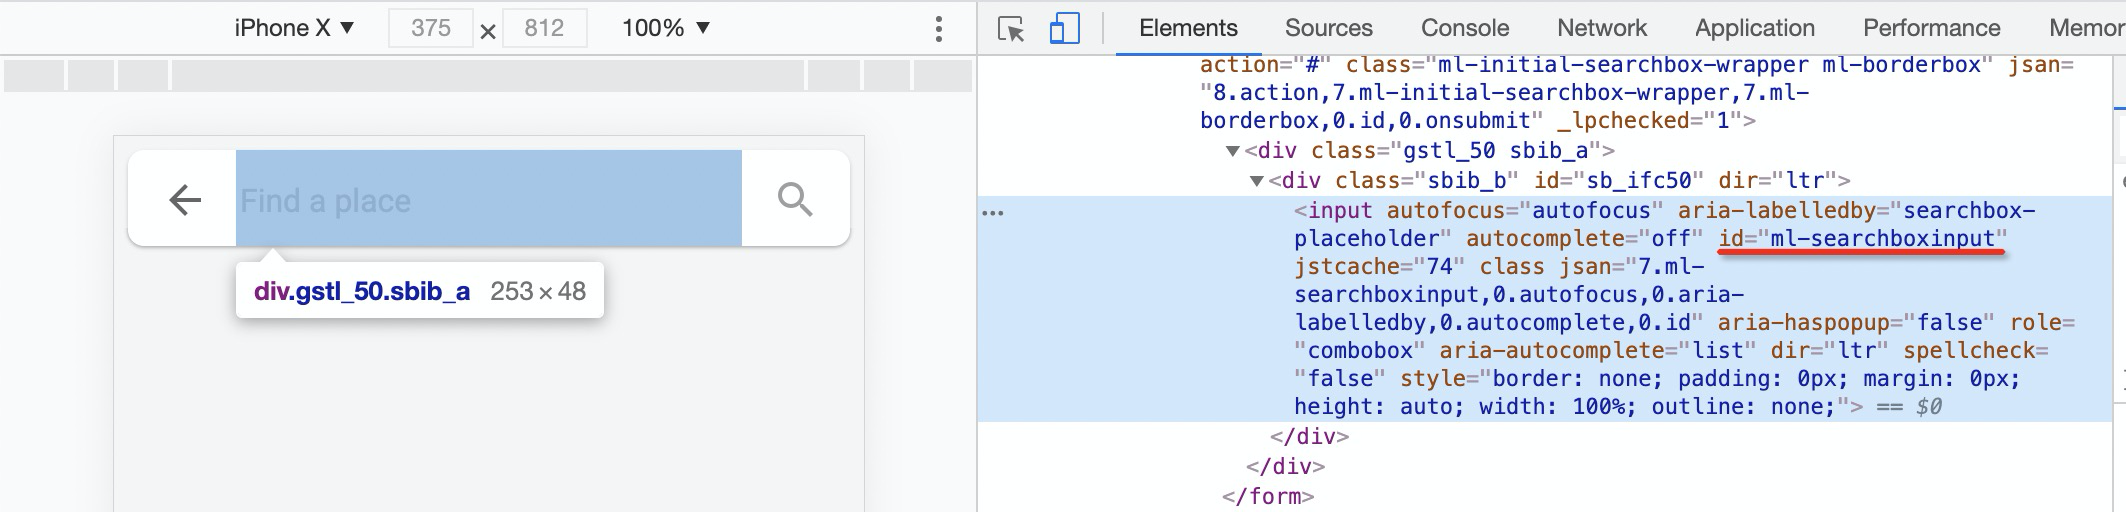
Devtools - Click search box

Devtools - Search box input

1
2
3
4
await page.click('div.ml-searchbox-button-textarea');
await page.waitForSelector('#ml-searchboxinput');
// fill in content
await page.fill('#ml-searchboxinput', 'Zhagana');

Second, press Enter to search.

1
2
// press Enter to start searching
await page.press('#ml-searchboxinput', 'Enter');

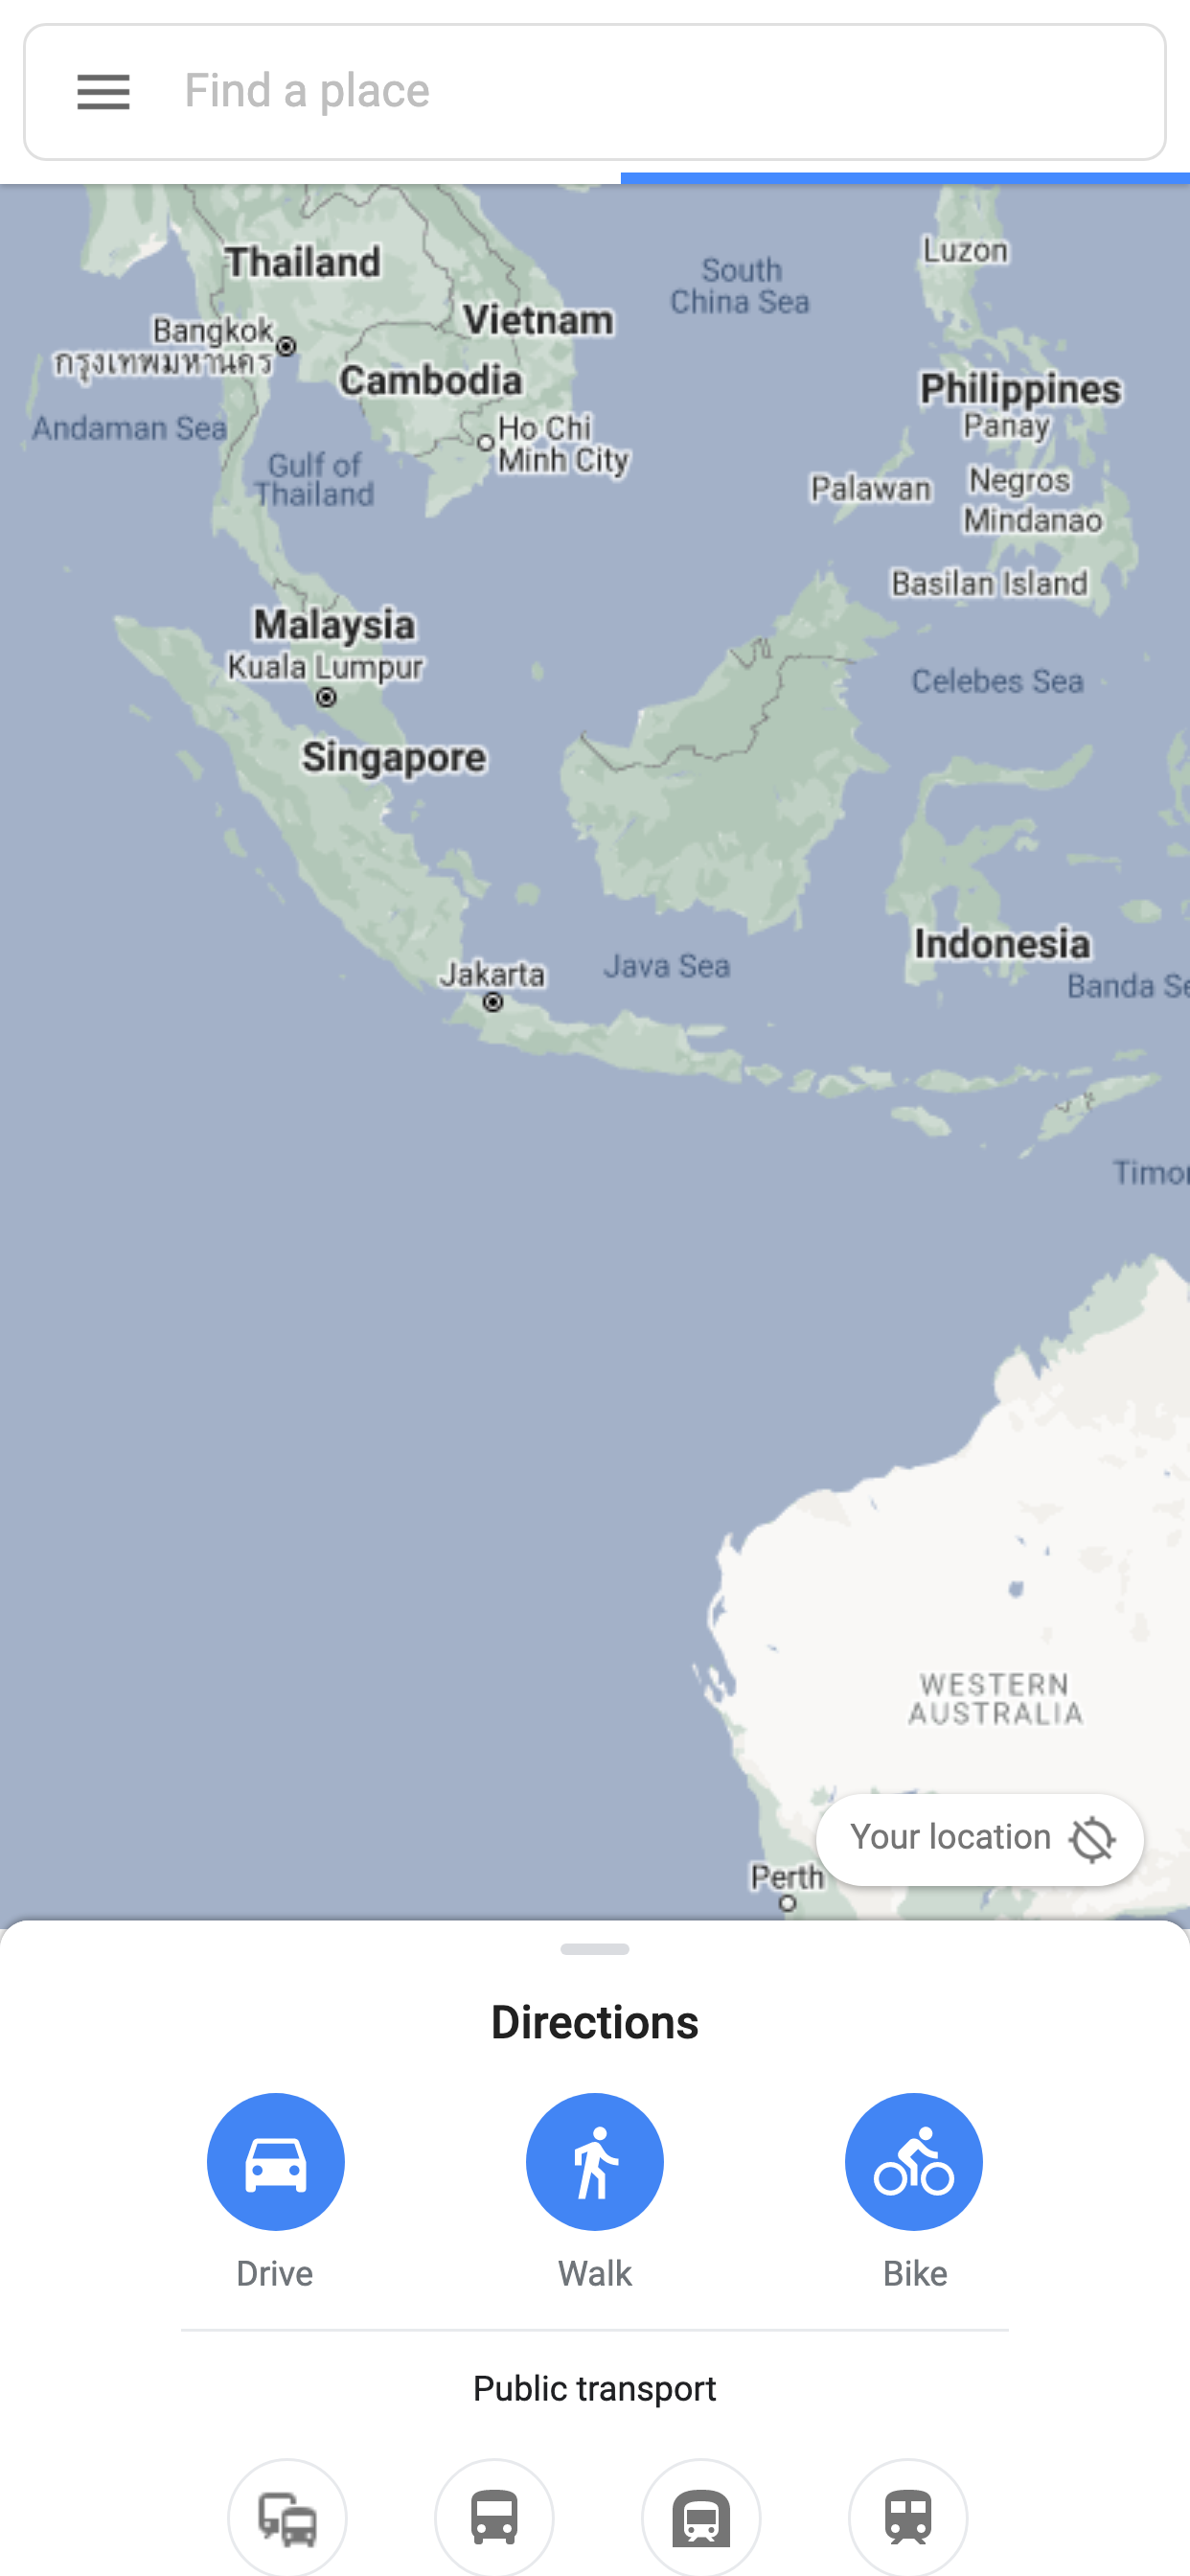
After that, we will get the target place with a red point, and there should be a Directions button at the bottom of the page.

Devtools - Directions

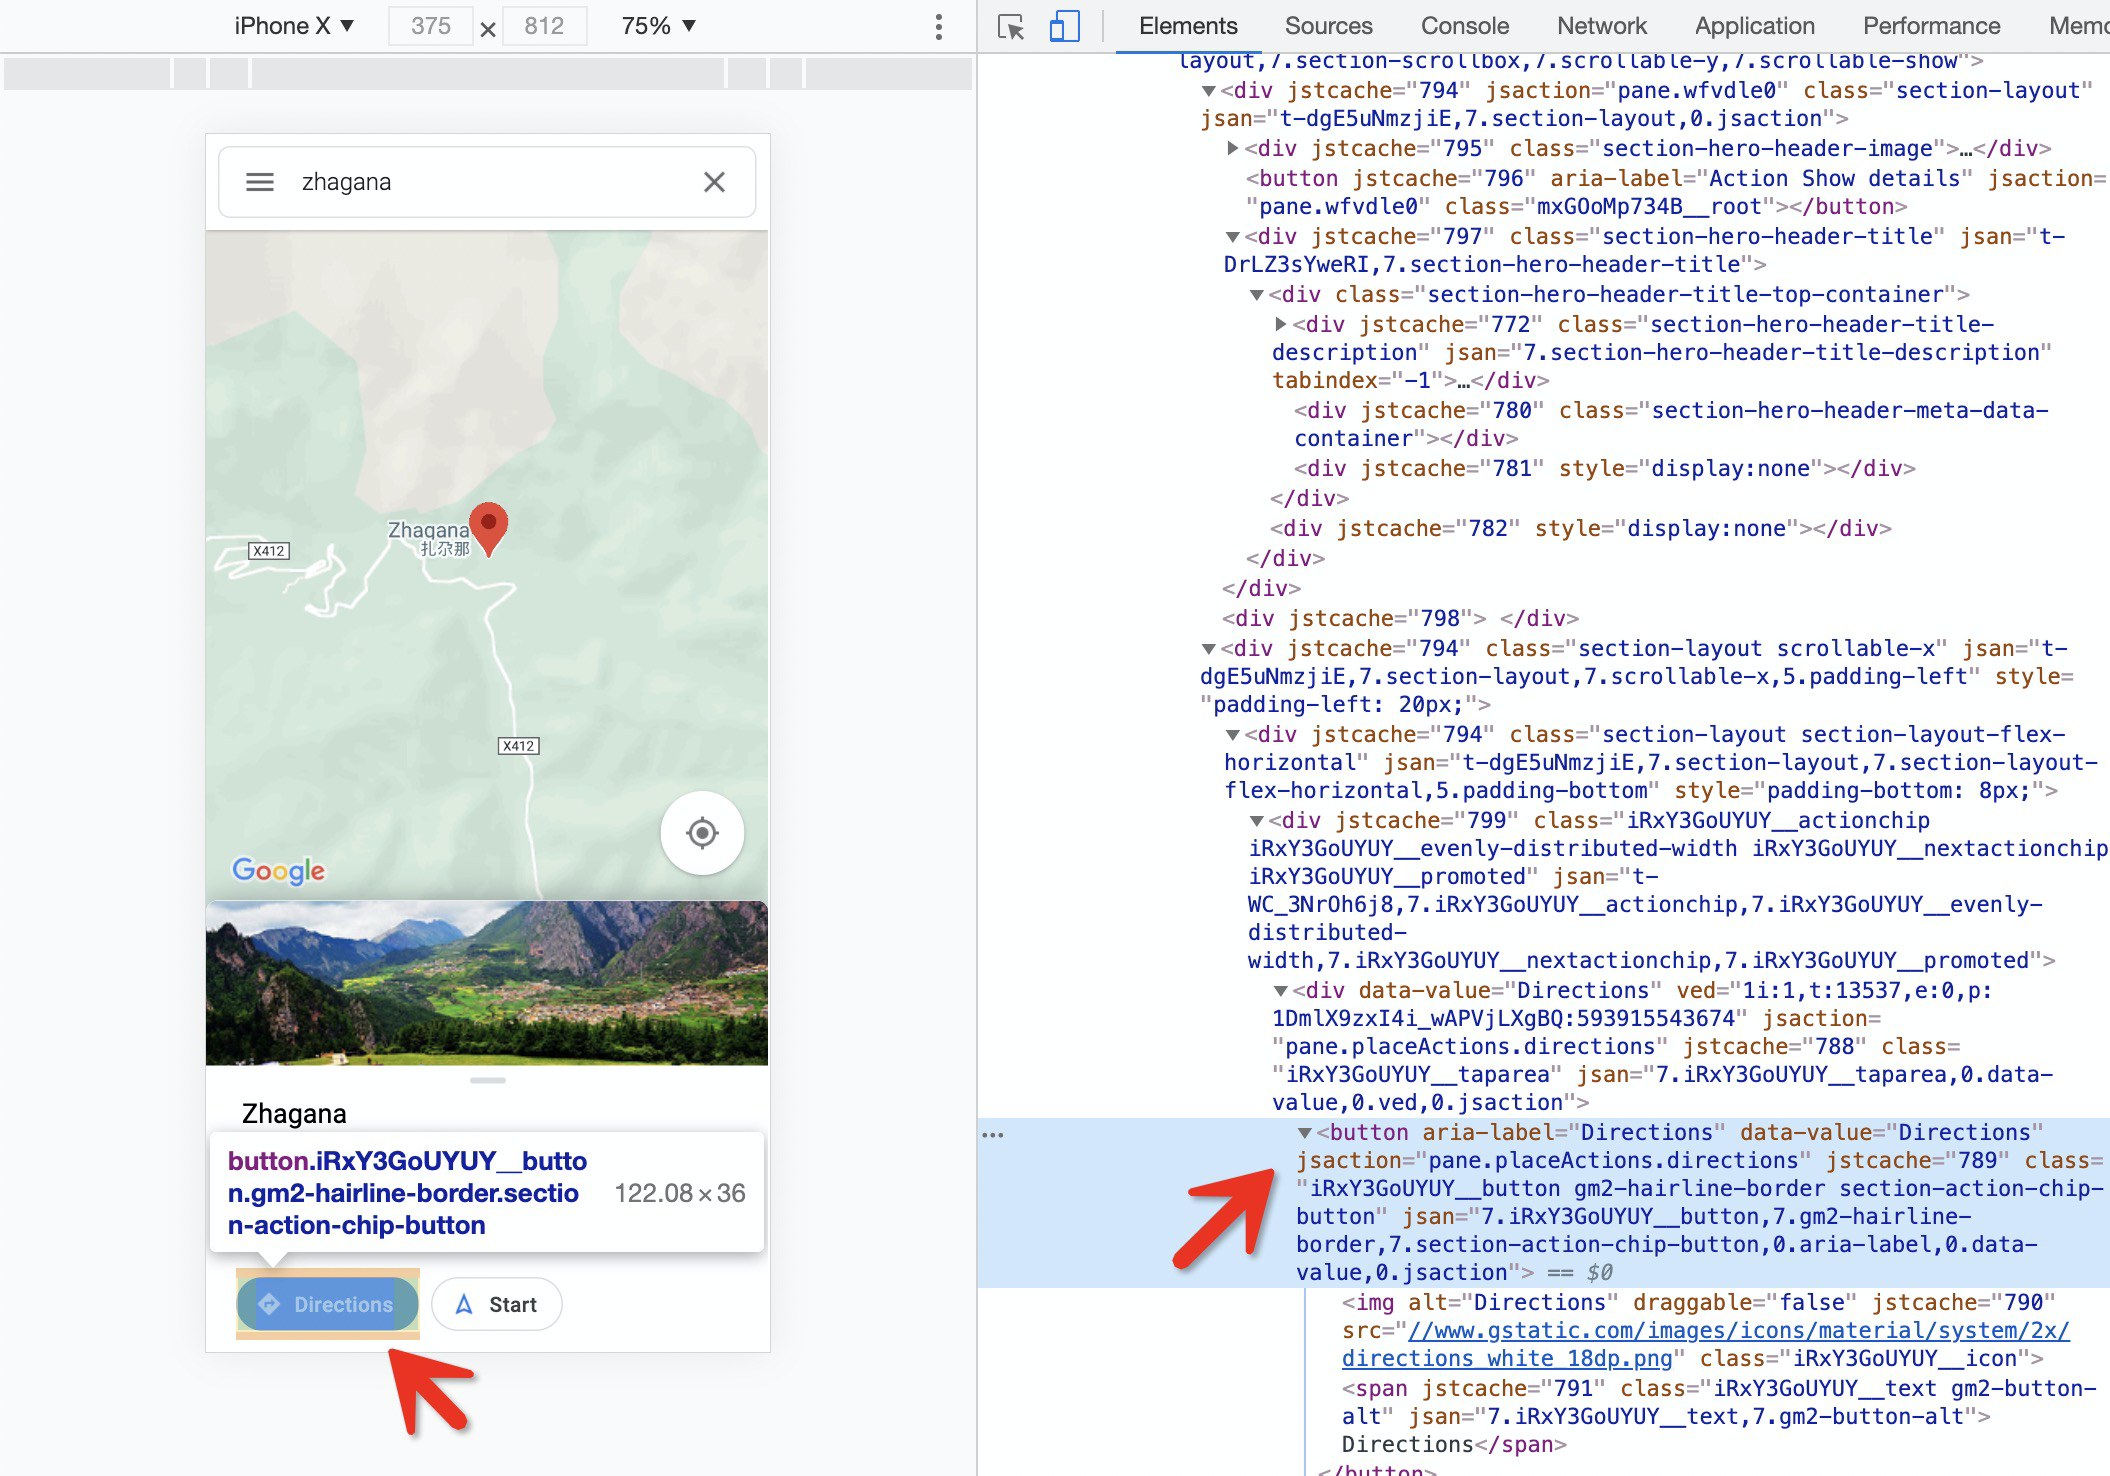
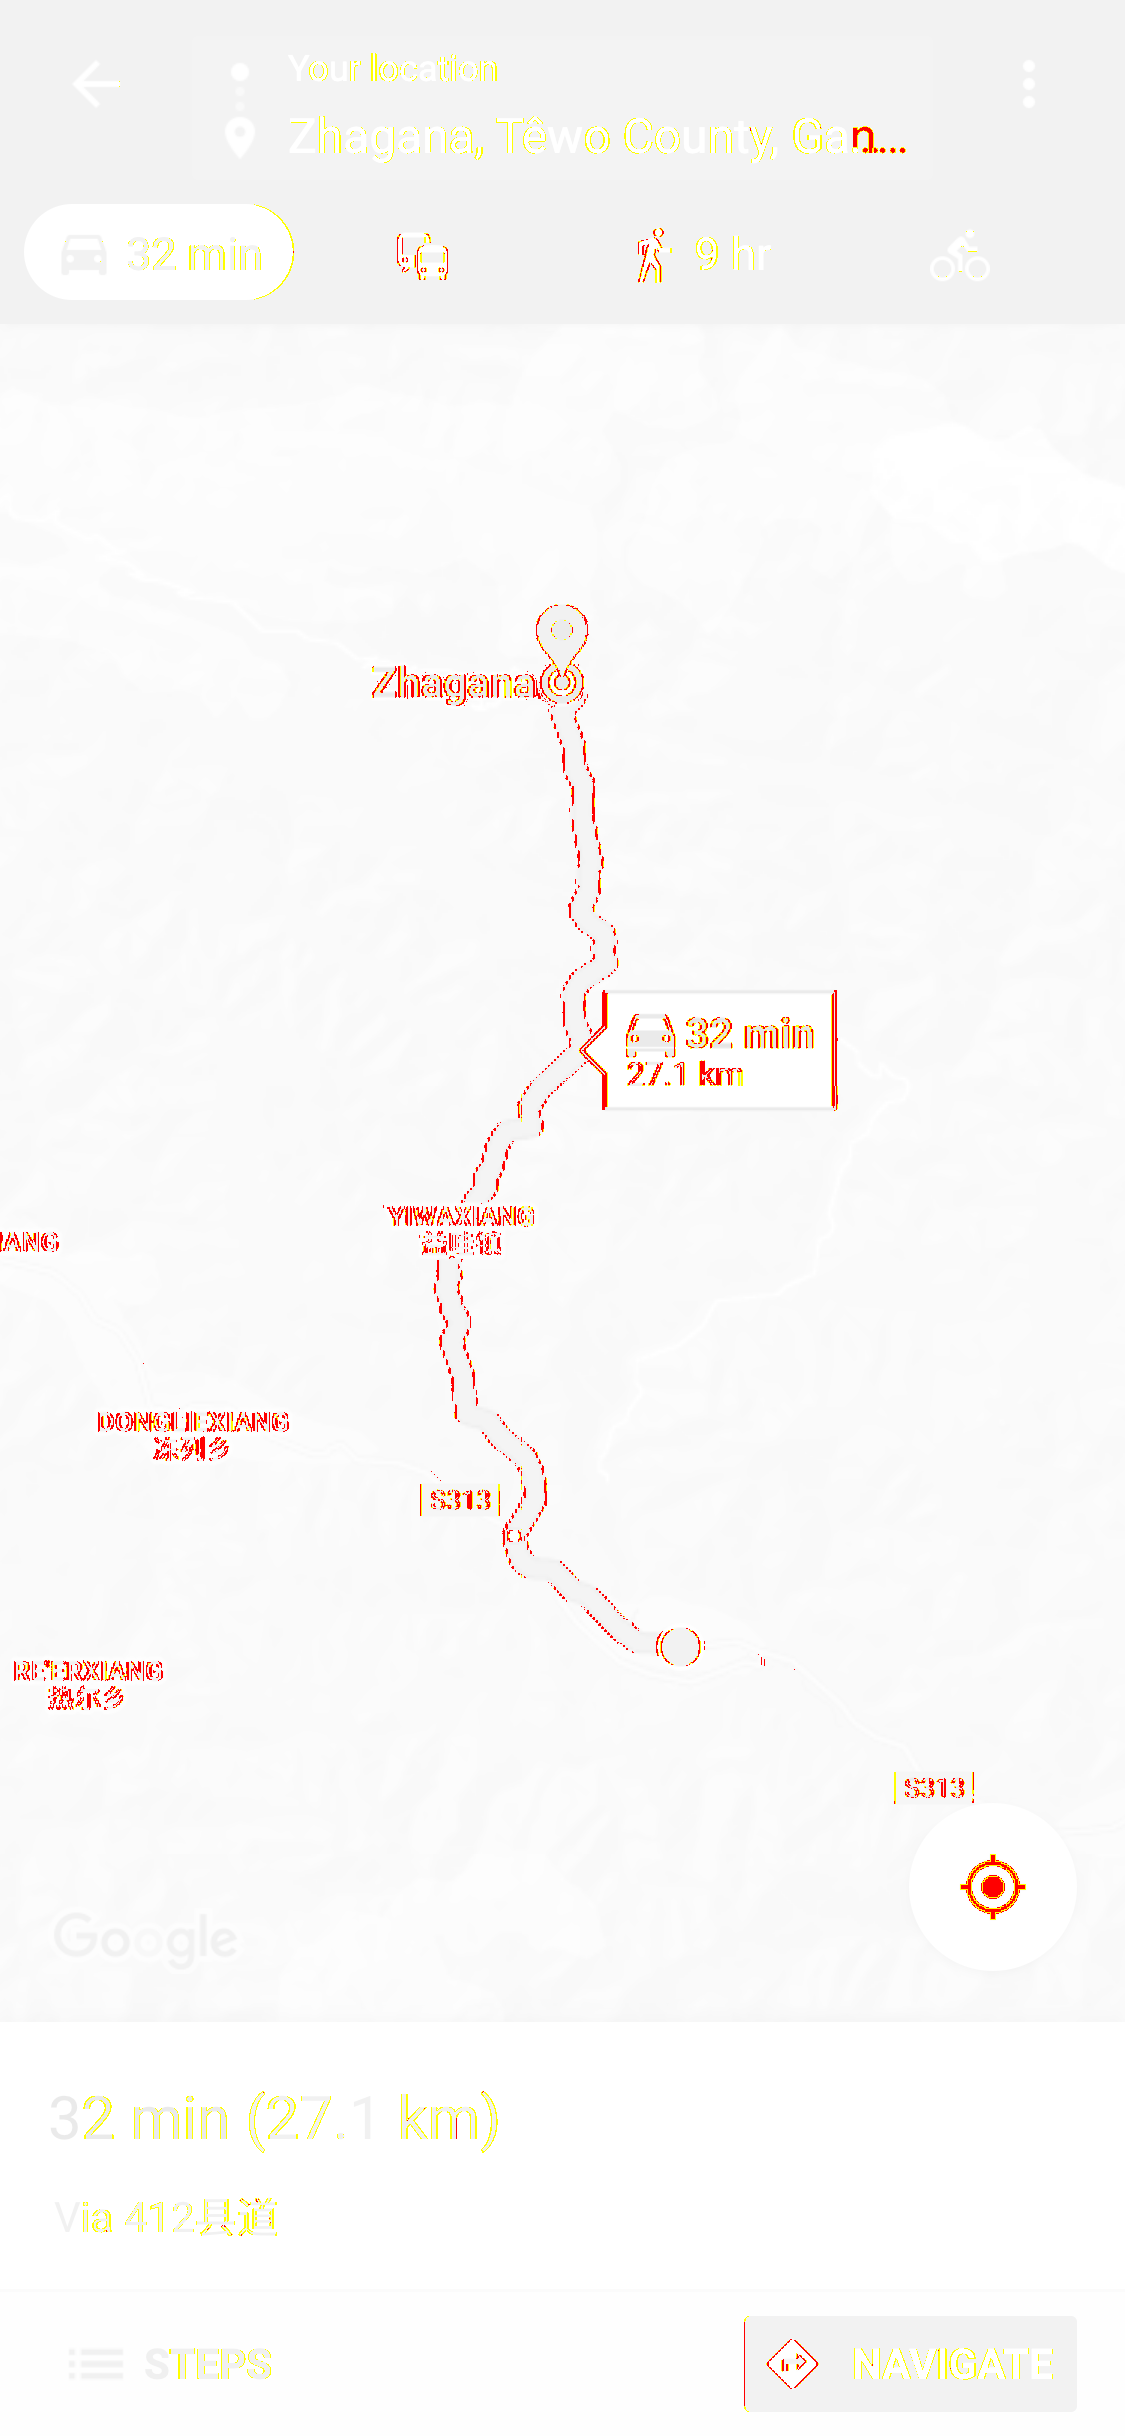
Third, click Directions and google will provide us the navigation route.

1
2
3
4
// click Directions
const directionsSelector = 'button[jsaction="pane.placeActions.directions"]'
await page.waitForSelector(directionsSelector);
await page.click(directionsSelector)

Put them all together, with output path string as a result.

1
2
3
4
5
6
7
8
9
10
11
12
13
14
15
16
17
18
19
20
21
22
23
24
25
26
27
28
29
30
31
32
33
34
35
36
37
38
39
40
41
42
43
44
45
46
47
48
async function screenshot(browserType: BrowserType<Browser>): Promise<string> {
// use `browserType` from arguments instead of hardcode
const browser = await browserType.launch();
// simulate browser behavior on a mobile device
const iphone = devices['iPhone X']
const context = await browser.newContext({
...iphone,
geolocation: {
longitude: 103.2199128,
latitude: 34.0556586,
},
permissions: ['geolocation'],
});
// open web page
const page = await context.newPage();
await page.goto('https://www.google.com/maps');
// await page.waitForNavigation();

await page.waitForSelector('.ml-promotion-on-screen');
// click STAY ON WEB
await page.click('button.ml-promotion-action-button.ml-promotion-no-button');

// click `your location` to navi to current location
await page.click('button.ml-button-my-location-fab');

// click to trigger input field
await page.click('div.ml-searchbox-button-textarea');
await page.waitForSelector('#ml-searchboxinput');
// fill in content
await page.fill('#ml-searchboxinput', 'Zhagana');
// press Enter to start searching
await page.press('#ml-searchboxinput', 'Enter');

// click Directions
const directionsSelector = 'button[jsaction="pane.placeActions.directions"]'
await page.waitForSelector(directionsSelector);
await page.click(directionsSelector);
// wait for result
// As I can not find any event which means direction finished,
// so we need to wait for some seconds for Google Maps to load resources
await page.waitForTimeout(2000);

// take screenshot, output path string as a result.
const outputPath = `out/map-${browserType.name()}.png`;
await page.screenshot({ path: outputPath });
await browser.close();
return outputPath;
}

Okay! Here comes out the two maps screenshots:

chromium webkit
chromium webkit

Image Diff

The 2 screenshots look exactly the same, but we still want to use some tools to check. Pixelmatch is a simple and fast JavaScript pixel-level image comparison library. Create a function to compare two file A and B.

1
2
3
4
5
6
7
8
9
10
11
12
13
14
15
16
17
18
19
async function diff(fileA: string, fileB: string) {
// read the 2 different PNG file
const mapChromium = PNG.sync.read(fs.readFileSync(fileA));
const mapWebkit = PNG.sync.read(fs.readFileSync(fileB));
// init the diff image buffer
const { width, height } = mapChromium;
const diffImg = new PNG({ width, height });
// pixel diff
pixelmatch(
mapChromium.data,
mapWebkit.data,
diffImg.data,
width,
height,
{ threshold: 0.1 }
);
// print out the diff image
fs.writeFileSync('out/map-diff.png', PNG.sync.write(diffImg));
}

And call this function after we generated the two screenshots:

1
2
3
4
5
6
7
8
9
10

(async () => {
const BROWSER_TYPES = [ chromium, webkit ];
// make screenshot all together
const maps = await Promise.all(BROWSER_TYPES.map((browserType) => {
return screenshot(browserType);
}));

await diff(maps[0], maps[1]);
})();

Bingo! Google Maps did a great job in the two different browser with almost the same behavior. The only different are font weight and also the navigate route weight.

Maps diff

All source code can be found in Github.
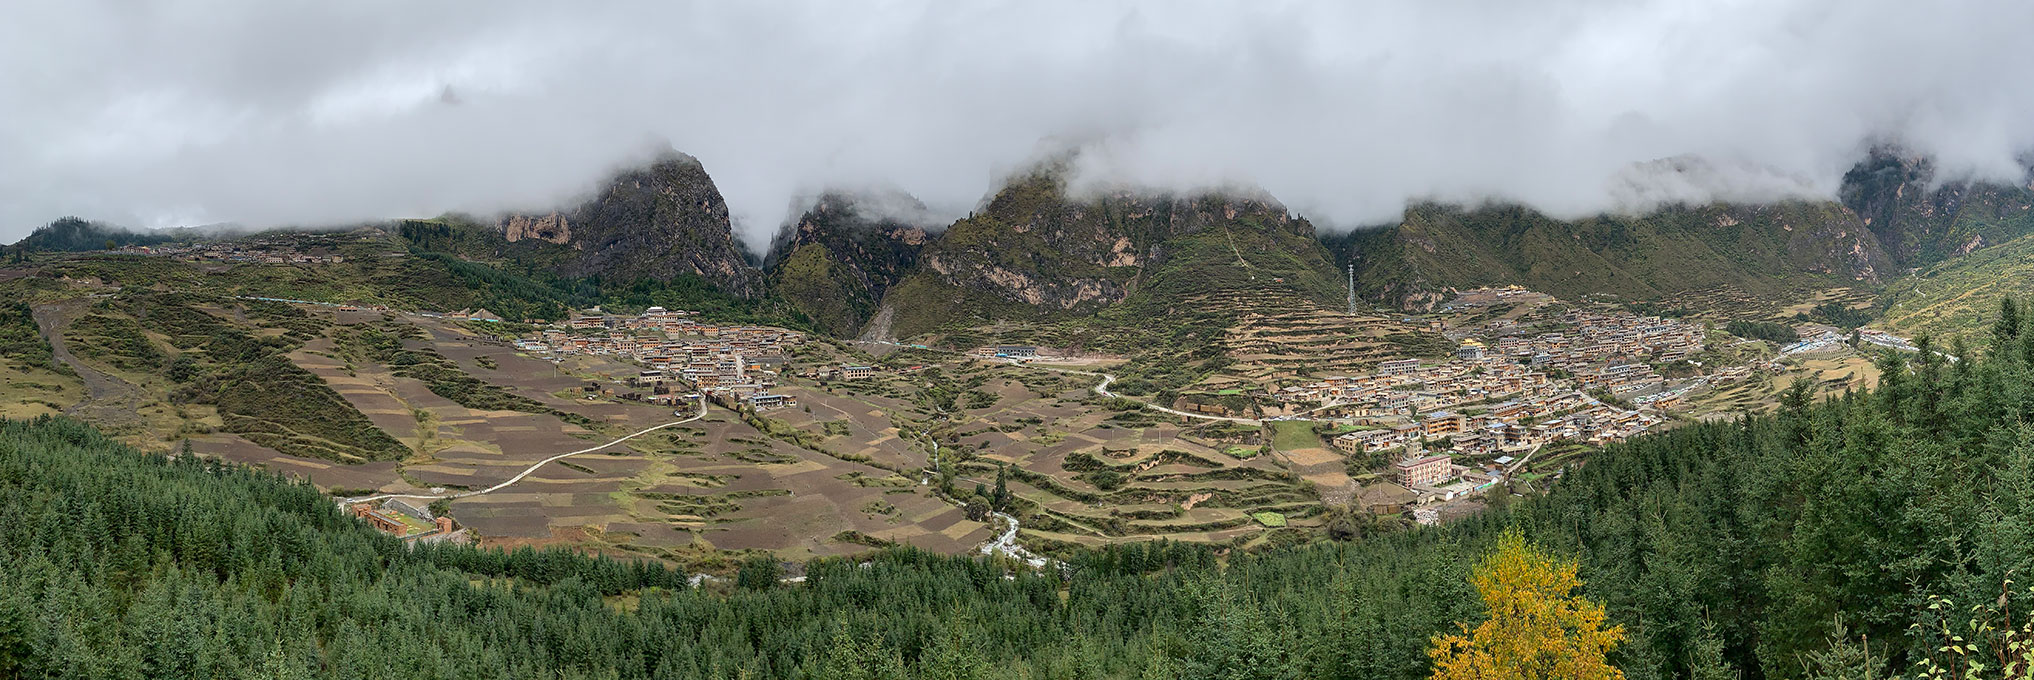
Postscript

Zhagana is a wonderful place in Tiewu County, Gannan (Tibetan Autonomous Prefecture), Gansu province, China. Zhagana means “Rock Box” in Tibetan language, which is fitting as it is surrounded by large rocky spires on all sides.

Zhagana